Apr 24, 2021
Ubuntu 21.04 Hirsute Hippo is here! Today I'm going to look at how to use pfSense to boot into the installer over the network. I am going to be installing the Desktop version but the same would apply to the Server version as well.
There are a couple of reasons that I can think of that you might want to do this.
- If you have a lot of computers you'd like to install on at once, you don't have to have multiple usb drives or CDs.
- You misplaced your usb drive that was large enough to fit in the installer on it.
I would be doing this because of the second reason... and because it's a fun learning experience.
I have loosely followed the instructions from this guide.
Gathering all the files
There are a few files that we need to get this to work. Two from syslinux and two from the ubuntu ISO itself. We also need to write a short configuration file.
Let's start with syslinux. We need pxelinux.0 and ldlinux.c32. The easiest way I find to get these is to download syslinux from kernel.org and just extract them.
$ cp bios/core/pxelinux.0 ~/netboot-files/
$ cp bios/com32/elflink/ldlinux/ldlinux.c32 ~/netboot-files/
Now we have those we need initrd and vmlinuz from the Ubuntu 21.04 installer. So let's download it, mount it and grab those files.
$ sudo mkdir /media/iso
$ sudo mount ubuntu-21.04-desktop-amd64.iso /media/iso
$ cp /media/iso/casper/{initrd,vmlinuz} ~/netboot-files/
$ sudo umount /media/iso
Finally we need to create a configuration file for pxelinux.
$ mkdir ~/netboot-files/pxelinux.cfg/
$ touch ~/netboot-files/pxelinux.cfg/default
Then using your favourite text editor put the following into the default file.
DEFAULT install
LABEL install
    KERNEL vmlinuz
    INITRD initrd
    APPEND root=/dev/ram0 ramdisk_size=4000000 ip=dhcp url=https://releases.ubuntu.com/21.04/ubuntu-21.04-desktop-amd64.iso
Here I've set the size of the ramdisk to ~4GB, the thought behind this was that the iso is 2.8GB and we need some room for the actual installation. This might be way too much, I haven't really experimented with it but it works.
This is an extremely basic configuration, you can go quite in depth with pxelinux. There are modules for doing all sorts of things such as creating menus. I'd recommend reading the wiki for more information.
If you've followed all the steps above you should have:
$ ls -AlR ~/netboot-files
/home/ross/netboot-files:
total 126115
-r--r--r-- 1 ross ross 115774131 Apr 24 14:59 initrd
-rwxrwxr-x 1 ross ross    122308 Apr 24 14:49 ldlinux.c32
-rw-rw-r-- 1 ross ross     46909 Apr 24 14:49 pxelinux.0
drwxrwxr-x 2 ross ross         3 Apr 24 15:02 pxelinux.cfg
-r--r--r-- 1 ross ross  14732384 Apr 24 14:59 vmlinuz

/home/ross/netboot-files/pxelinux.cfg:
total 1
-rw-rw-r-- 1 ross ross 0 Apr 24 15:02 default
Setting up TFTP in pfSense
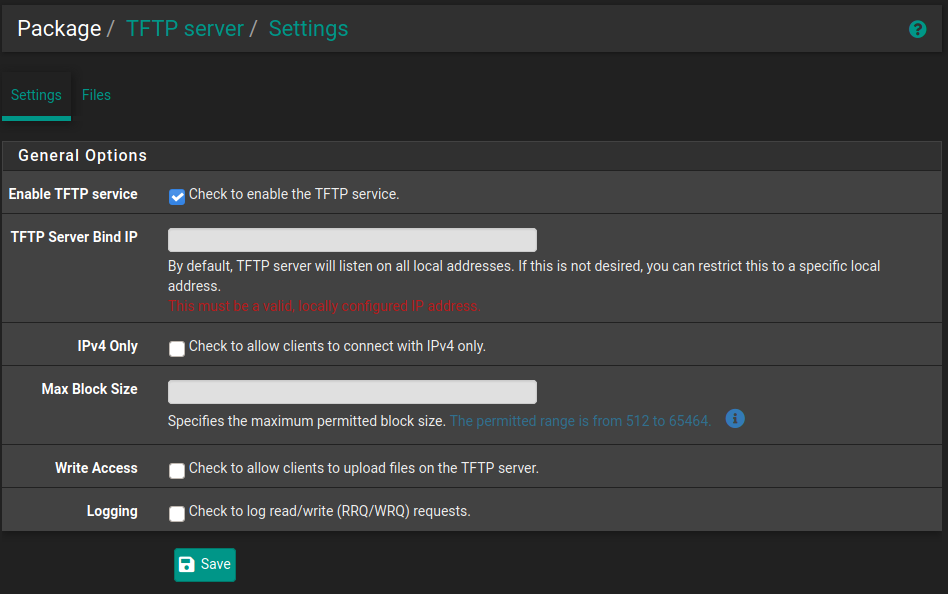
Since pfSense is already acting as the dhcp server it makes it really simple to get everything up and running. The only thing we need is a TFTP server which pfSense has a package for.
This can be done by navigating to System -> Package Manager then going to Available Packages and installing the one called tftpd.
Once this is installed you can navigate to Services->TFTP Server and check "Enable TFTP service" if it isn't already enabled.
Now we need to get our files from ~/netboot-files onto pfSense in the correct location. You can use the webUI to do this by going to the Files section but you can only do one file at time as far as I can tell and it won't handle the folder containing the configuration.
The easiest way is just to use scp.
$ scp -r ~/netboot-files/* admin@192.168.0.1:/tftpboot/
initrd         100%  110MB  93.3MB/s   00:01
ldlinux.c32    100%  119KB  60.2MB/s   00:00
pxelinux.0     100%   46KB  46.2MB/s   00:00
default        100%  185   621.3KB/s   00:00
vmlinuz        100%   14MB  92.9MB/s   00:00
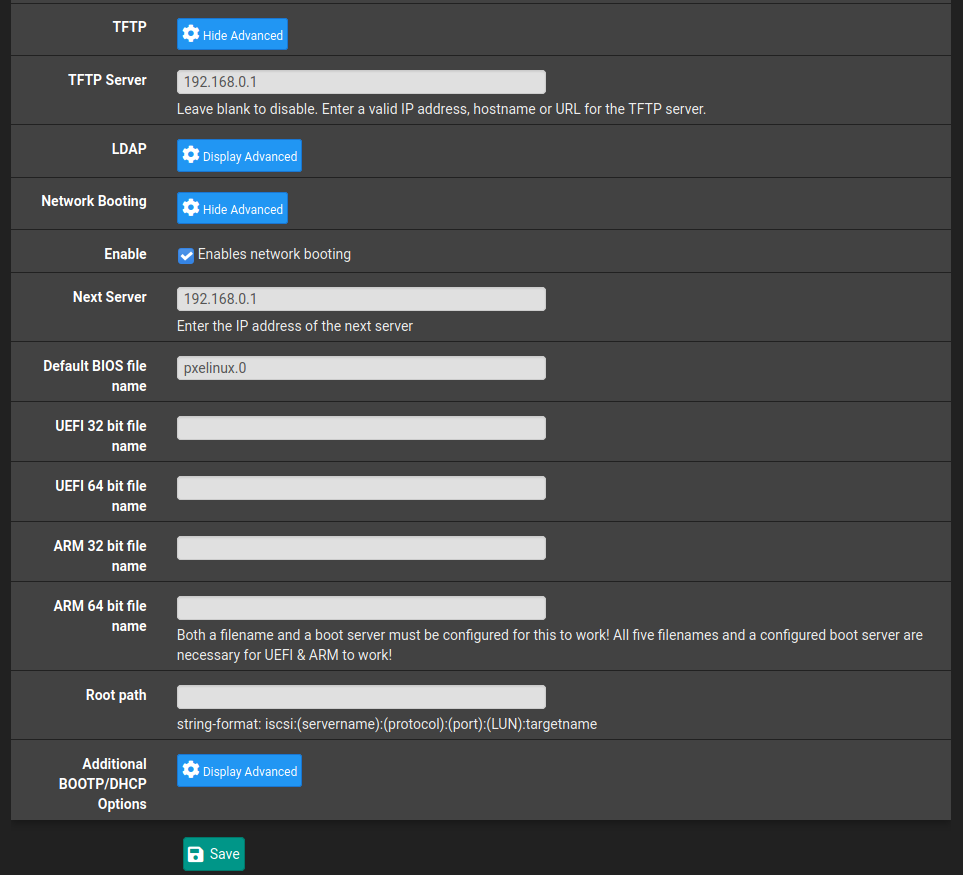
pfSense DHCP Configuration
Now that TFTP is up and running there's some configuration we need to do for the dhcp server to tell enable network booting and point it at our TFTP server.
Navigate to Services->DHCP Server and scroll all the way down to near the bottom where you should see TFTP and Network Booting options. Click Display Advanced to see all the options.
Check the enable box and then there are just a few fields we need to fill in.
The IP address for my pfSense is 192.168.0.1 but change your to suit.
Installing Ubuntu!
That's everything we need to do in pfSense. We should now to be able to boot over the network so let's give it a go.
I'm going to use a virtual box VM for this so I can easily capture the process but it absolutely works on physical hardware but you may have to tweak some BIOS settings since this particular setup is not using UEFI.
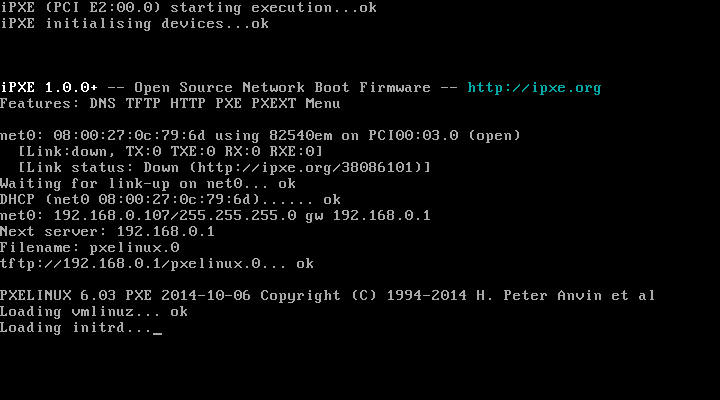
It's found our TFP server and is loading the ramdisk.
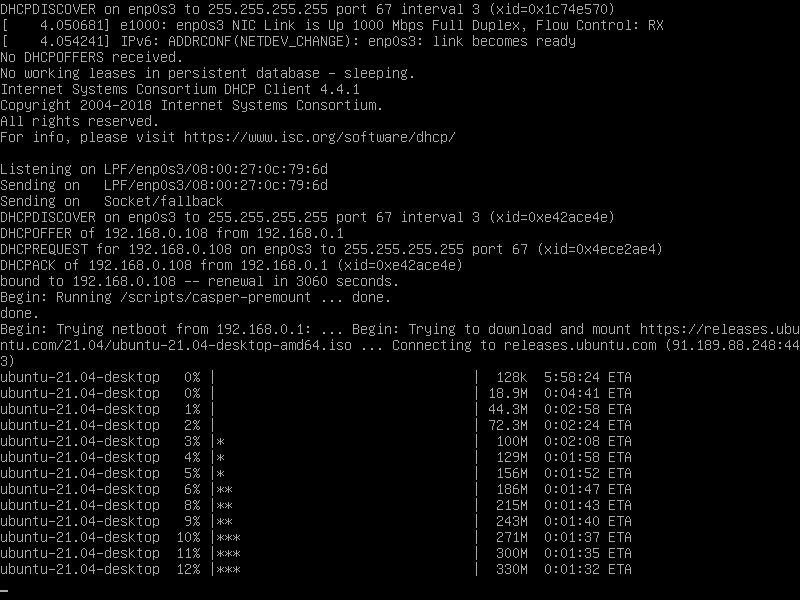
Downloading of the ISO has started.
And a few minutes later we are in! We can now install Ubuntu 21.04.
Summary
pfSense makes this whole process fairly painless with very minimal configuration required thanks to it's plugins. If you are not using pfSense I recommend following the guide I linked for setting up dhcp and TFTP manually.
These steps are a very minimal configuration and what if we wanted to be able to serve two different distros installers over the network, say we had an LTS for servers and the latest version for any desktops? Well, this should be possible with syslinux/pxelinux and I definitely intend to dive deeper into it in future and explore it's modules.
If any of you have any cool setups for this then get in touch and let me know. Contact details be found here.
Apr 17, 2021
I would like to have the ability to connect to my home network wherever I am in the world so I have decided to setup a VPN.
I'm running pfSense as my router/firewall solution which makes this really easy!
There are a few reasons I'd like to do this:
- Ensuring that my traffic is encrypted when connected to a public network.
- Using my own Pi-hole DNS wherever I am in the world.
- Securely self hosting various services that I can access from anywhere. Using bitwarden in this way is something I'd like to explore in the near future.
- Ability to remotely manage my home infrastructure from anywhere.
I had originally planned to use Wireguard for my VPN solution as it was added to pfSense in version 2.5.0, however it has now been removed in version 2.5.1. You can read more in this blog post. This is extremely unfortunate but I'm sure it was done for the right reasons. I'll be keeping an eye on the progress of wireguard within FreeBSD & pfSense, hopefully any issues can be quickly resolved.
Getting Started
The pfSense documentation has a great guide on how to do this in it's recipe section so instead of going over each step in minute detail here is the relevant recipe.
I'm just going to quickly run through it at a high level and provide information on various settings I changed. Also I'm not sure when the documentation is written but it differed slightly to what is the latest version as I'm writing this post, pfSense 2.5.1.
If you haven't checked out the recipe section of pfSense's documentation before I highly recommend you do so, it has a ton of information on how to perform various different tasks and setup all sorts of functionality.
The first thing we need to do is to go to VPN -> OpenVPN in the navbar at the top then click the link for the wizard which walks you through the process of getting everything setup.
I'm going to number the steps based on the order in which we go through them, you'll notice that the wizard within pfSense may jump a few steps at a time, this is due to the options we are choosing. We do not have to complete all 11 steps.
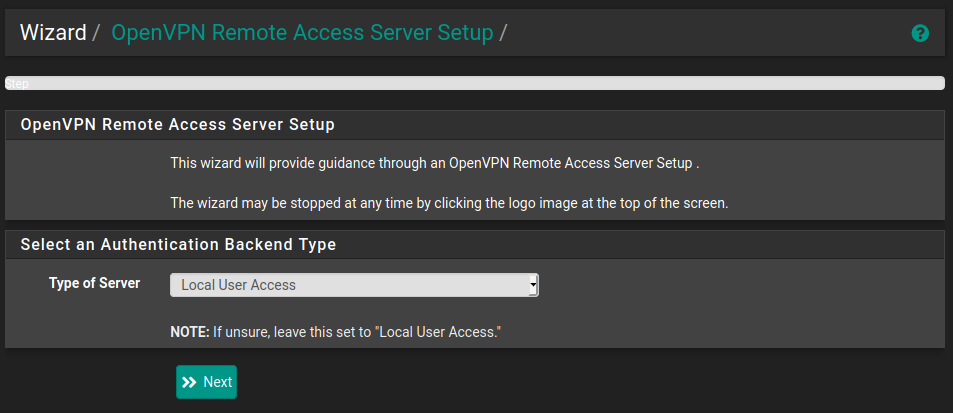
Step 1 - Authentication Backend
The first screen asks what authentication backend is to be used. We are just going to leave this on Local User Access and click next. In a later step we will create the user within pfSense itself.
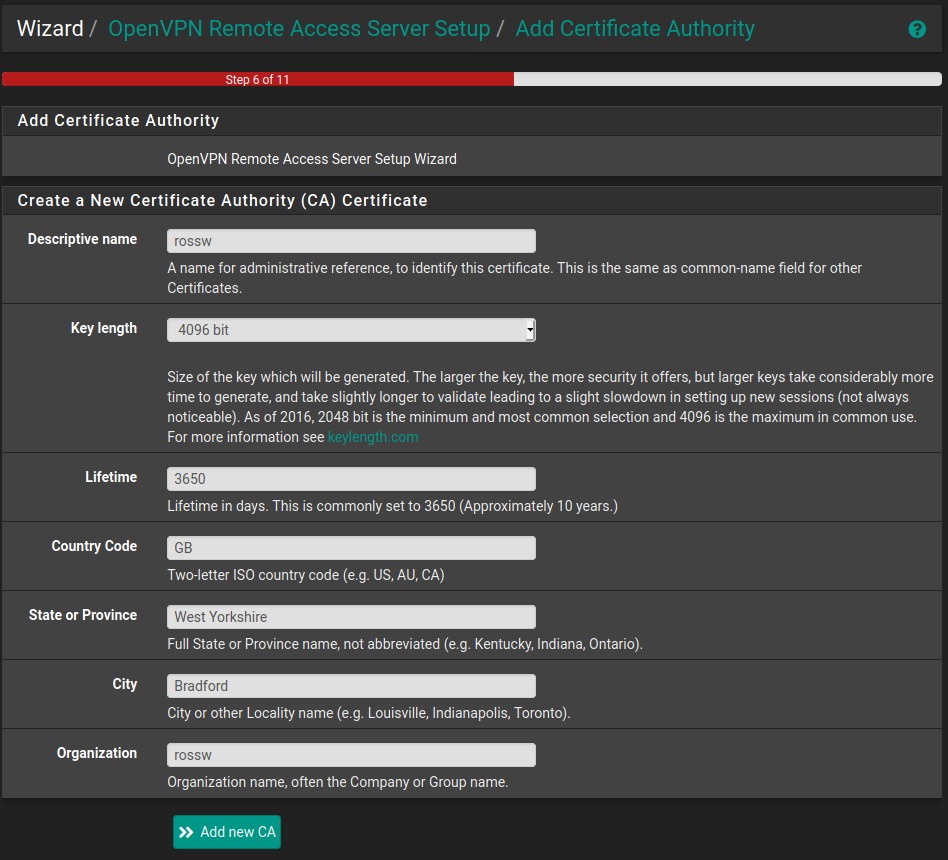
Step 2 - Creating a Certificate Authority
A certificate authority is required to generate & sign certificates used by clients to authenticate with the server. It can also revoke certificates.
For the purposes of this I'm just going to use rossw as my organisation but you should use whatever you feel would be the best bit and ensure that all the fields are filled in.
Once done we simply click Add new CA.
We only need to do this step once since you can continue to use this same Certificate Authority in future.
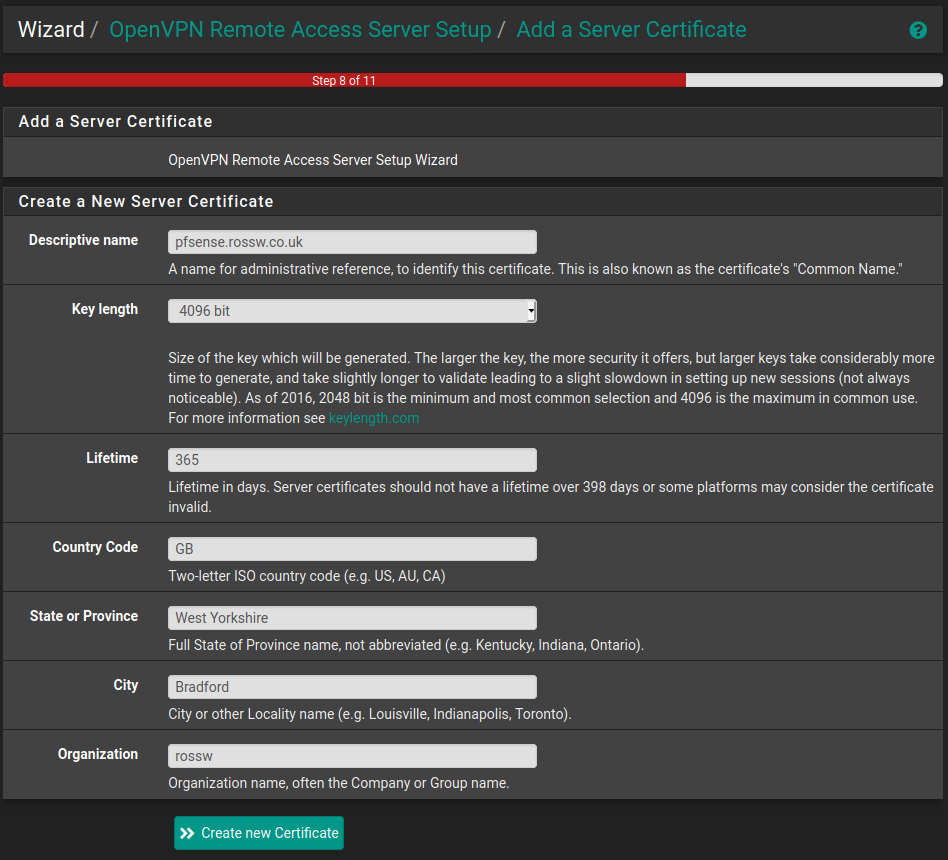
Step 3 - Create a Server Certificate
Now that we have a CA we need to generate a certificate that the server will use to identify itself to any clients that are trying to connect.
The pfSense documentation recommends using the hostname for the Descriptive name so I'll use pfsense.rossw.co.uk as an example here and once again the organisation will be rossw. You should once again use whatever makes the most sense for your use case.
This is very similar to the previous step and there is quite a bit of duplication from the so once it's complete click create new certificate and we will move on.
Step 4 - Server Setup
This next page can seem quite overwhelming at first since there are a lot of different options. However the recipe explains each of the options in plenty of detail, and in most cases the default is fine.
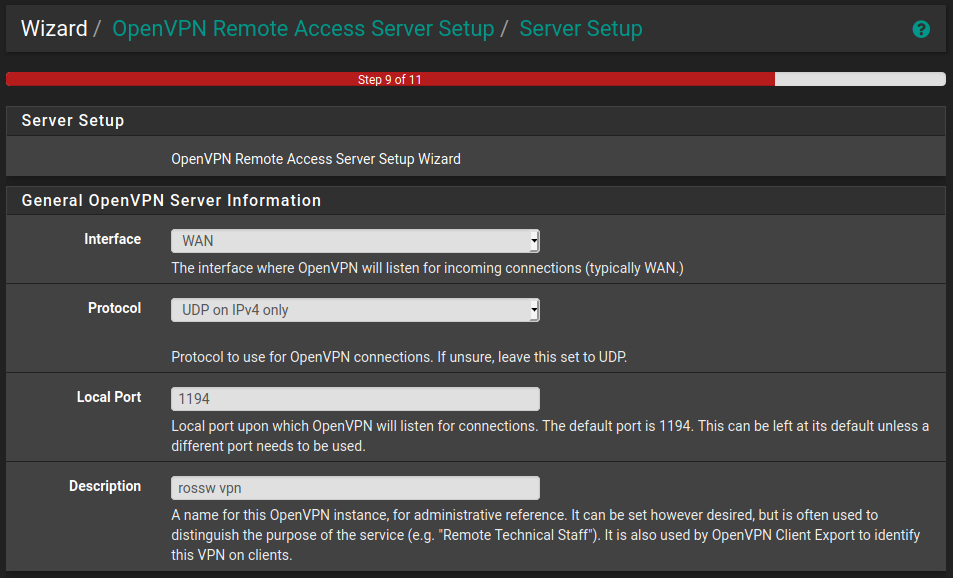
The general server settings are quite straight forward. I went with the defaults here.
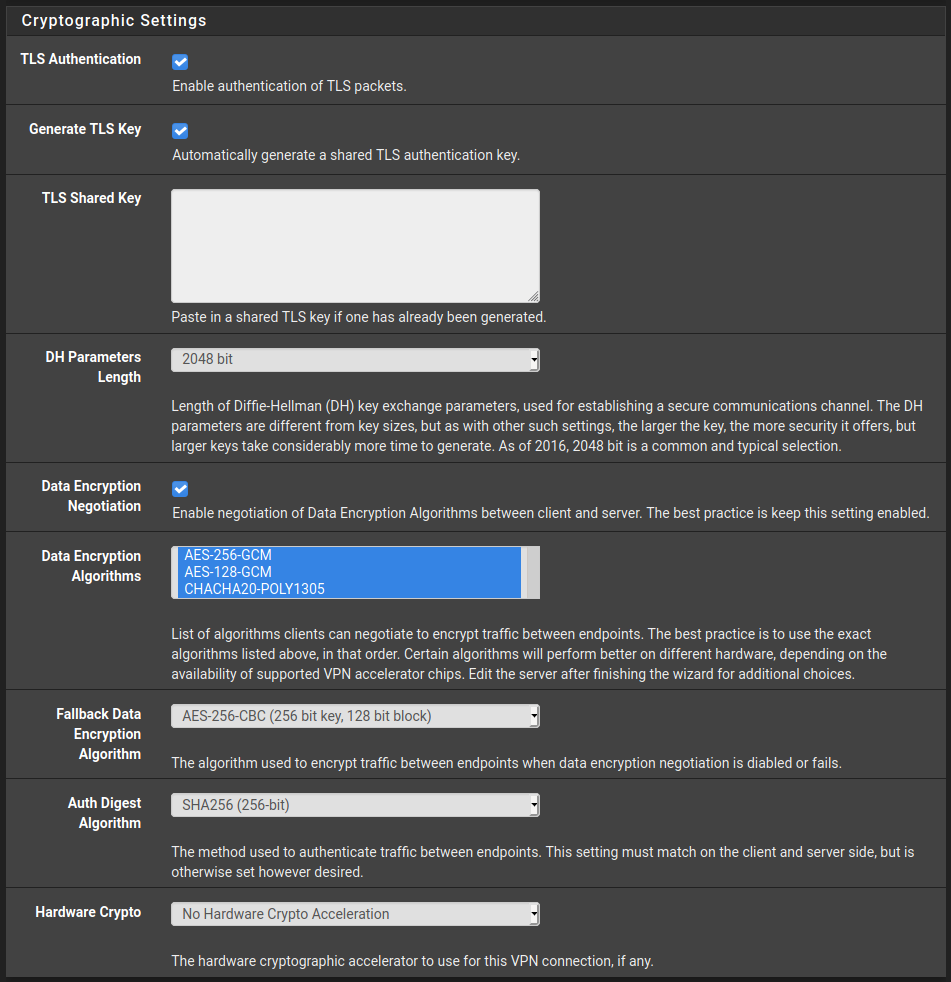
Again we can mostly go with the default here. Just make sure TLS Authentication and Generate TLS Key are selected as explained in the recipe.
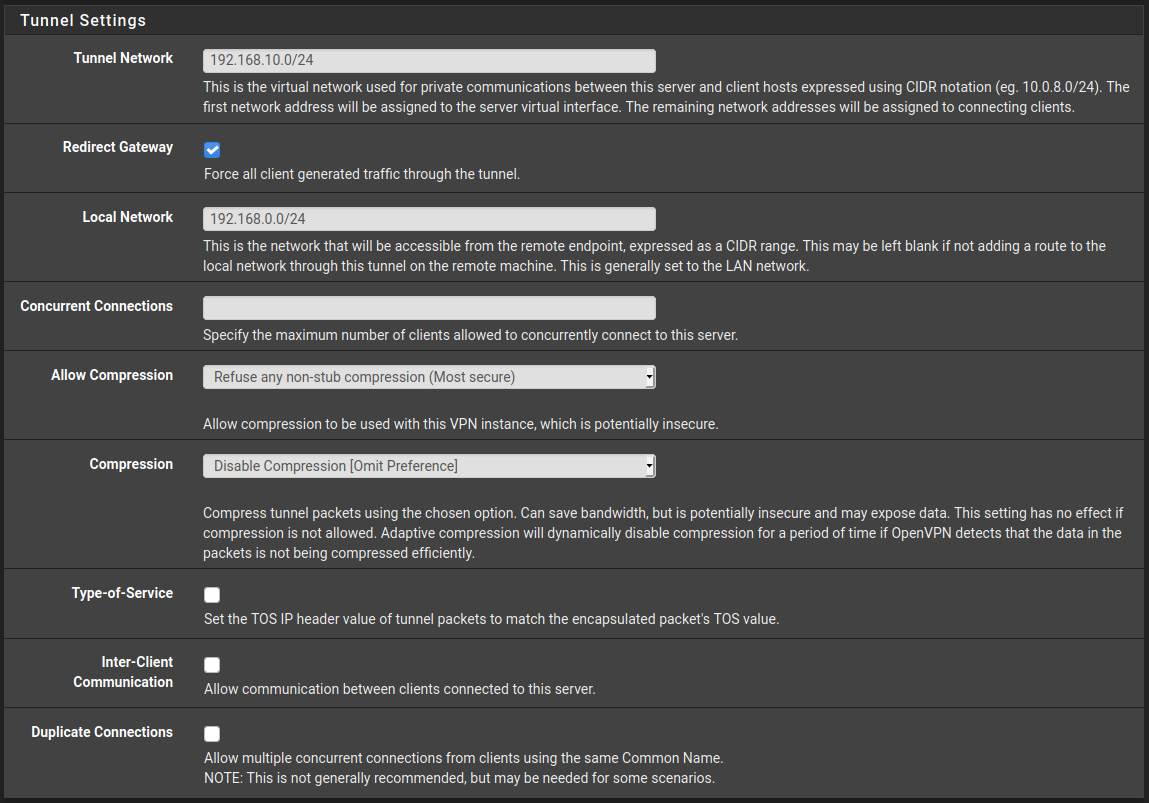
Next is the tunnel settings, this is where you will want to change a few values.
-
Tunnel network. I Chose 192.168.10.0/24 here because my home network is on 192.168.0.0/24. The 10 was just an arbitrary number. You can choose whatever you'd like really.
-
Redirect Gateway. I've enabled this as one of the main reasons for wanting to setup a vpn is for security when on public networks so I want all my traffic to be forced through the VPN.
-
Local Network. As mentioned earlier my local network is 192.168.0.0/24 but you should enter yours here. So if it was 192.168.1.0/24 you'd enter that here for example.
The rest I have left as the default but feel free to explore compression and what that means for security if bandwidth is a concern to you.
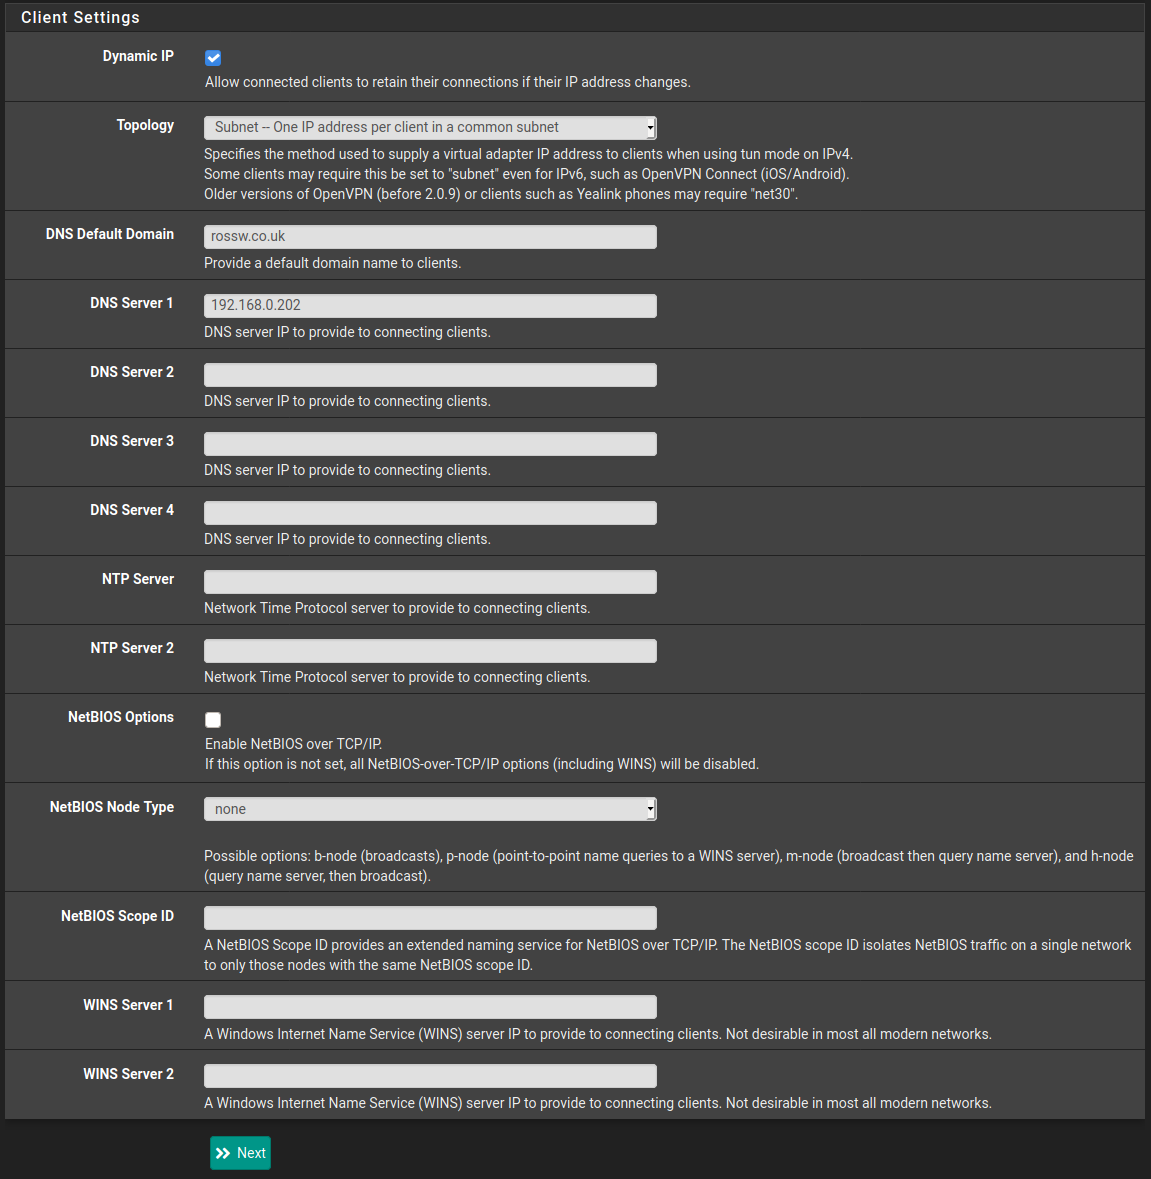
Finally we have client settings. Here I just provide the ip address of my pi-hole for the DNS as I want all my DNS to go through that.
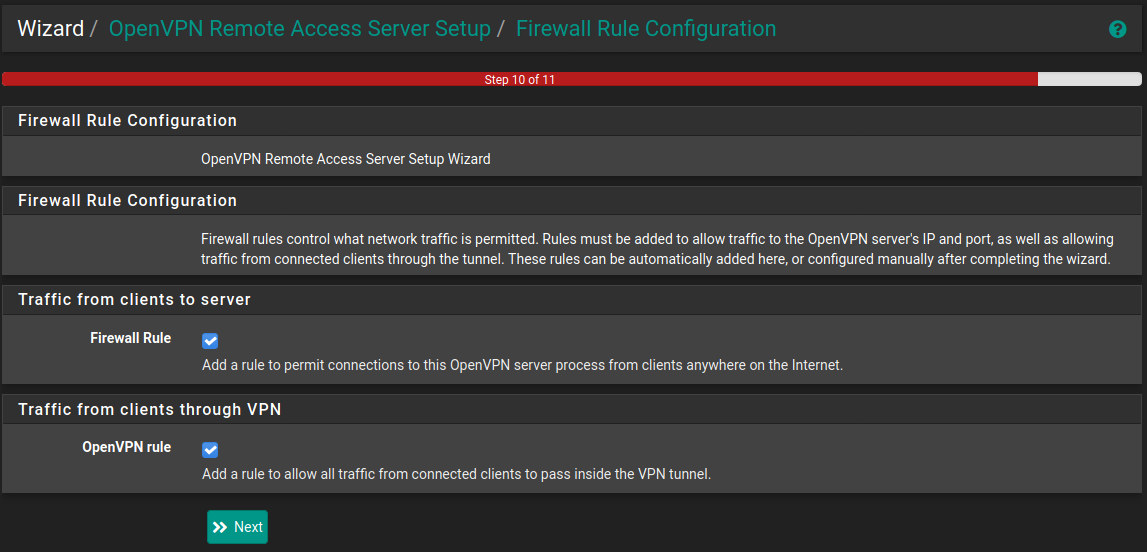
Step 5 - Firewall Configuration
On this final screen we tell pfSense to create the relevant firewall rules for allowing VPN connections and traffic through the tunnel.
This will allow connections from anywhere to attempt to connect to the VPN, if you'd like to lock this down then make sure you edit the firewall rules accordingly.
Finished! - but not quite...
The final screen lets you know that the server configuration is complete. But we aren't quite finished yet.

Remember how in the first step I mentioned we need to create a user? Let's do that now.
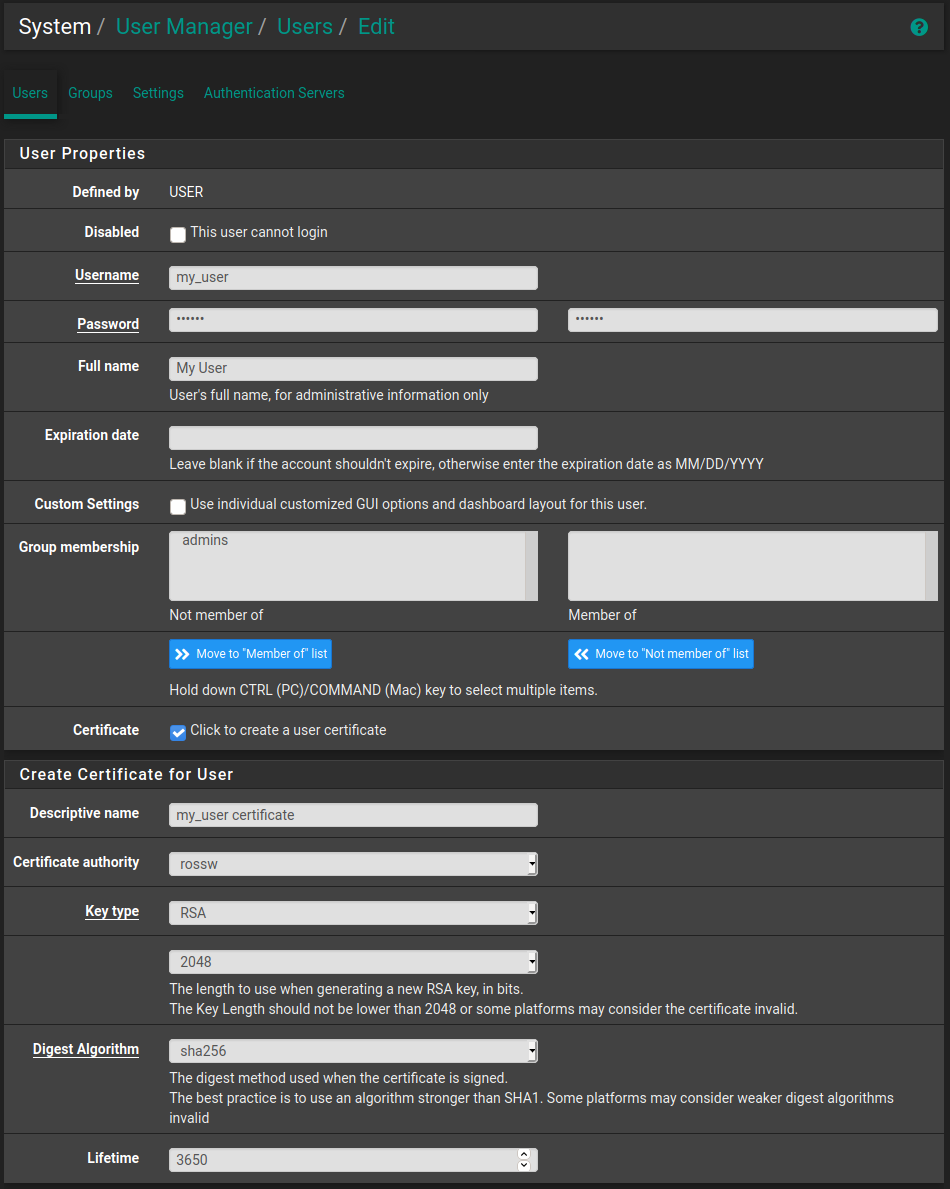
Step 6 - Adding a User
Navigate to System -> User Manager then click the Add button.
Fill in your desired Username, Password and Full name. I already have a user for this so I've just filled in some example information.
It is also important to click the "Click to create a user certificate" check box so that a certificate that the user will need to authenticate with OpenVPN is generated.
Give this a Descriptive name and select the certificate authority we created when setting up OpenVPN. The defaults are fine for the rest of it. Then simply scroll down a click Save.
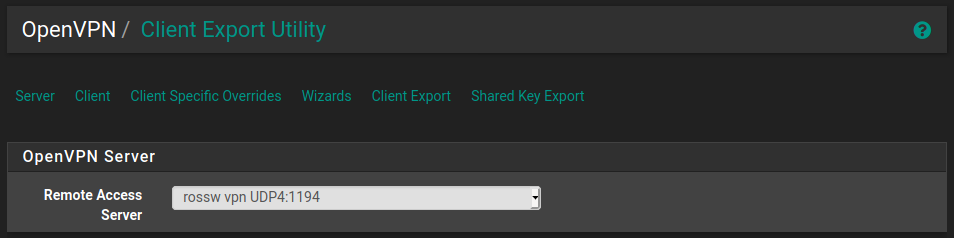
Step 7 - Client Export
As explained in the recipe the easiest way to export configuration for different VPN clients is to use the OpenVPN Client Export Package.
This can be done by navigating to System -> Package Manager then going to Available Packages and installing the one called openvpn-client-export.
This will give us a new option under VPN -> OpenVPN called Client Export. Simply navigate here and then choose the Remote Access Server, in this case we only have a single OpenVPN server so it will already be selected for us. The rest of the settings can be left at default.
Scroll down to the bottom and there will be a list of OpenVPN clients, click the one that is relevant to yourself and it should begin the download. You can find more information in the documentation.
Initially I am just going to set this up on my Android phone so I'll choose Android under Inline Configurations.
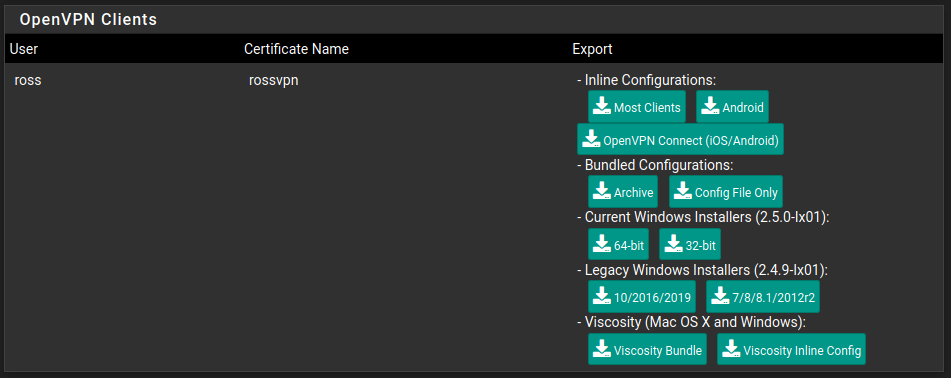
It is vitally important that you keep this configuration safe and secure. If anybody gets access to it they will be able to connect to your VPN.
Once you have the configuration downloaded simply import it into your VPN client of choice and you should be able to connect!
Finally Finished!
So let's give it a whirl. I'll open up the OpenVPN client on my phone, import the configuration, try to connect and enter my password when prompted.
To make sure it's working I'll try to browse to my TrueNAS web UI and see if it loads.
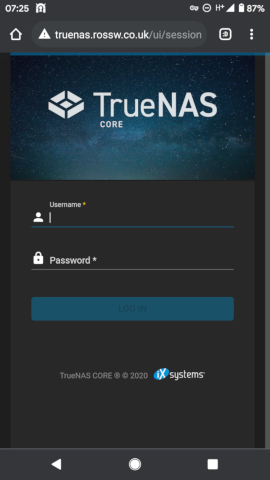
Success!
I can now securely access my home network from anywhere in the world and all my DNS requests are going through my Pi-hole for ad blocking on the move.
Apr 10, 2021
Currently on my main desktop machine my /home directory resides on it's own 256gb SSD with an ext4 filesystem. I want to move this to a ZFS file system to take advantage of snapshots and compression.
I have a TrueNAS VM running in proxmox (more on this in future posts) that /home then gets backed up to using an rsync cronjob. However as I mentioned previously I would like to be able to take advantage of ZFS snapshots when doing backups so I have decided to move /home to ZFS.
I run ubuntu 20.10 on my desktop PC so this is fairly straight forward. ZFS is supported out of the box in the kernel on ubuntu.
The only aspect that makes this a little bit messy is that I want to use ZFS on the existing SSD that currently has /home on it. I'll need to do quite a bit of juggling files!
I am going to performing these steps on the live filesystem. I would recommend using a LiveCD for performing these tasks where possible, it'll make it a bit easier.
Install ZFS tools
First of all, let's install the tools required for managing zfs using apt.
sudo apt install zfsutils-linux
Copy /home to a temporary location
The next thing to do is copy the entire contents of the /home directory that currently resides on the SSD to a temporary location. I have plenty of space on my main drive so I'm just going to create a folder there and copy everything to it but if you don't then feel free to use an external drive.
sudo mkdir /temp-hone
sudo cp -av /home/* /temp-home/
Using the -a flag with cp preserves all file attributes and copies recursively so there shouldn't be any strange file permission issues.
Edit fstab and un-mount the drive
Now that the /home directory has been safely copied to another location fstab can be edited to stop the partition being mounted at boot. For now we can simply comment out the relevant line incase something goes wrong and we need to revert this step.
sudo vim /etc/fstab

# /home was on /dev/sda1 during installation
# UUID=myuuid /home           ext4    defaults
Next we can un-mount the drive. We use the -lf flags for force and lazy un-mounting. Without this it won't work as there are programs running that are actively trying to access this file system. As I mentioned in the introduction, doing this in a live filesystem is less than ideal, which is why we had to take this step.
sudo umount -lf /dev/sda1
Copy /temp-home back to /home
Due to doing this live and having plenty of drive space we are going to copy the /temp-home/ to /home so that when we reboot everything is where ubuntu suspects it to be, this now resides on the main OS drive.
A reboot is required because the home drive was unmounted lazily and we need to be able to delete the partition(s) so that ZFS can do it's thing!
sudo cp -a /temp-home/* /home/
reboot
The system should come back up as if nothing has changed.
Use fdisk to delete partition
Before we can create the ZFS pool we need to delete all partitions from the second SSD, which is /dev/sda. For this we can use fdisk.
$ sudo fdisk /dev/sda

Welcome to fdisk (util-linux 2.36).
Changes will remain in memory only, until you decide to write them.
Be careful before using the write command.


Command (m for help): d
Selected partition 1
Partition 1 has been deleted.

Command (m for help): w

The partition table has been altered.
Calling ioctl() to re-read partition table.
Synching disks.
Using d to delete the partition as there was only one and then w to write the changes to the partition table.
Create a ZFS pool
The preparation is done so now we can finally create the ZFS pool. I'm going with mypool for lack of a better name but feel free to choose whatever you like. I also only have the one drive so don't need to worry about any sort of RAIDZ or mirroring. If you have multiple drives you'd like in your pool you'll want to check out the manpages for zpool create.
sudo zpool create mypool /dev/sda
Then just a quick zpool status to check it was created.
$ sudo zpool status
pool: mypool
state: ONLINE
scan: none requested
config:

    NAME        STATE     READ WRITE CKSUM
    mypool      ONLINE       0     0     0
    sda         ONLINE       0     0     0

errors: No known data errors
Create the ZFS filesystem
Next create the home filesystem in the pool.
sudo zfs create mypool/home
And check it was created.
sudo zfs list
NAME          USED  AVAIL     REFER  MOUNTPOINT
mypool        984K   225G      192K  /mypool
mypool/home   192K   225G      192K  /mypool/home
Enable Compression
Another benefit of ZFS is being able to use compression, there is a slight performance hit for doing this but since it's just my home directory I don't see this causing me any issues. So let's enable that now.
sudo zfs set compression=lz4 mypool
I'm going to go with lz4 since this gives a great compression ratio for minimal performance impact. ServeTheHome have a great article about it.
Copy /temp-home to it's new home
Great! Now that we have the filesystem and it is mounted at /mypool/home we can copy all the contents of the /temp-home/ directory to it once again using the cp -a command.
sudo cp -av /temp-home/* /mypool/home
Then check the pool usage and compression ratio.
$ sudo zfs list -o name,used,avail,refer,mountpoint,compressratio
NAME          USED  AVAIL     REFER  MOUNTPOINT     RATIO
mypool       54.9G   170G      192K  /mypool        1.22x
mypool/home  54.9G   170G     54.9G  /mypool/home   1.22x
And yep, we can now see that 54.9G is used up and the compression ratio is 1.22x. Compression has definitely paid off!
Delete everything in /home and mount the ZFS filesystem
Now to clean up and get the ZFS filesystem mounted at /home.
Delete the /home directory.
Then change the mountpoint of mypool/home to /home. And while we are it we can stop mypool from mounting by setting it's mountpoint to none
sudo zfs set mountpoint=/home mypool/home
sudo zfs set mountpoint=none mypool
Check that the files are there in /home.
$ ll /home
total 22
drwxr-xr-x  4 root root    4 Apr  6 12:40 ./
drwxr-xr-x 24 root root 4096 Apr  6 12:46 ../
drwx------  2 root root    2 Mar  4 17:42 lost+found/
drwxr-xr-x 46 ross ross   72 Apr  6 13:57 ross/
Awesome! Everything is there and now on a ZFS filesystem.
Reboot
Finally a quick reboot to make sure it mounts correctly on boot, there's no reason it shouldn't but better to be safe than sorry.
And everything is there as expected. Success!
$ ll /home
total 22
drwxr-xr-x  4 root root    4 Apr  6 12:40 ./
drwxr-xr-x 24 root root 4096 Apr  6 12:46 ../
drwx------  2 root root    2 Mar  4 17:42 lost+found/
drwxr-xr-x 46 ross ross   72 Apr  6 13:57 ross/
Summary
This process would have been a bit less painful if I'd use a LiveCD environment as I wouldn't have to have copies of copies of my home directory but overall it seems to have gone well.
I'm going to keep /temp-home around for a week or so just incase something goes wrong but once I'm happy everything is okay that will be deleted.
The next steps are to learn more about ZFS snapshots and replication so that I can start using these for my backups. I'm pretty new to ZFS and this is the first time I've created pools and file systems in this manor, my only previous experience was in TrueNAS which gives a nice web UI interface for performing all these tasks.
I've heard great things about sanoid so I'm probably going to go with that for my snapshot and backup solution. I'll of course write a blog post about it but for now I'm just going to keep my rsync cronjob around for backups.
If you have any questions or suggestions for using ZFS please get in touch. Contact details be found here.
Apr 04, 2021
This is the first part of a mini series detailing how this blog was setup. In this part I will discuss provisioning using Terraform. The relevant files can be found in this github repo.
I have used a single AWS EC2 instance running ubuntu for hosting the actual content and Cloudflare for my DNS. I know this is slightly overkill for serving static web content but it was partially done this way as a learning exercise and this size of instance is available in the free tier. Even after the free period it isn't that expensive.
The aim of this is to discuss the process of setting up this blog, it is not to provide a guide on how to setup/install Terraform and setup your AWS credentials, there are plenty of resources available elsewhere for this, including the Terraform documentation. That said, the files in the github repo can be used as boiler-plate for provisioning your own EC2 instance for hosting web content.
I do not pretend to be an expert on terraform as I'm still learning,I have tried to follow best practices where possible but if anybody has any suggestions then please get in touch.
Disclaimers aside, let's get into it!
Preparation
There is a little bit of preparation required before creating the actual resources.
backend.tf
terraform {
    backend "s3" {
        bucket  = "rossw-backend"
        key     = "rossw-blog.tfstate"
        region  = "eu-west-2"
    }
}
First of all we define a backend to store the state. It's a good idea to use an external source for this rather than storing it locally since if it is ever lost then terraform will have no idea what the state is and will end up creating resources again.
For this I have created an s3 bucket on AWS that we can simply point terraform to.
provider.tf
terraform {
    required_providers {
        cloudflare = {
        source = "cloudflare/cloudflare"
        version = "~> 2.0"
        }
    }
}

provider "aws" {
    region = var.region
}

provider "cloudflare" {
}
Next we define the providers, for this we will use both aws and cloudflare for automatically creating the appropriate DNS records since we won't know the IP address of the EC2 instance until it has been created.
output.tf
output "ip_address" {
    value = aws_eip.server_ip.public_ip
}
As mentioned above we won't know the IP address until creation so let's define an output to easily access this. It will come in handy in the next part when we look at ansible.
variables.tf
variable "type" {
    type = string
    default = "t2.micro"
}

variable "region" {
    type = string
    default = "eu-west-2"
}

variable "number" {
    type = string
    default = "1"
}

variable "key_name" {
    type = string
}

variable "public_key" {
    type = string
}

variable "zone_id" {
    type = string
}

variable "my_public_ip" {
    type = string
}
terraform.tfvars
type = "t2.micro"
region = "eu-west-2"
number = "1"
key_name = "rossw-key"
Finally let's define our variables and set values for some of them in terraform.tfvars.
vars.sh
export CLOUDFLARE_API_KEY='your_cloudflare_api_key'
export CLOUDFLARE_ACCOUNT_ID='your_cloudflare_account_id'
export CLOUDFLARE_EMAIL='your_cloudflare_email'
export TF_VAR_zone_id='your_cloudflare_zone_id'
export TF_VAR_public_key='your_public_ssh_key'
export TF_VAR_my_public_ip='your_public_ip_at_home'
The remaining variables are secret so will be set as environment variables. To make this easier I've created a bash script that I can run prior to terraform but you can set them up however you'd like.
Resources
Now that everything is setup. Let's define our resources.
main.tf
resource "aws_instance" "blog_web_server" {
    ami             = "ami-096cb92bb3580c759"
    instance_type   = var.type
    key_name        = var.key_name
    vpc_security_group_ids = [aws_security_group.blog_security_group.id]

    tags = {
        Name = "Blog Web Server"
    }
}

resource "aws_key_pair" "blog_key" {
    key_name        = var.key_name
    public_key      = var.public_key
}

resource "aws_security_group" "blog_security_group" {
    name            = "Blog Web Server"
    description     = "Allow web and local SSH"

    ingress {
        from_port   = 80
        to_port     = 80
        protocol    = "tcp"
        cidr_blocks = ["0.0.0.0/0"]
    }

    ingress {
        from_port   = 443
        to_port     = 443
        protocol    = "tcp"
        cidr_blocks = ["0.0.0.0/0"]
    }

    ingress {
        from_port   = 22
        to_port     = 22
        protocol    = "tcp"
        cidr_blocks = ["${var.my_public_ip}/32"]
    }

    egress {
        from_port   = 0
        to_port     = 0
        protocol    = "-1"
        cidr_blocks = ["0.0.0.0/0"]
    }
}

resource "aws_eip" "server_ip" {
    vpc = true
    instance = aws_instance.blog_web_server.id
}

resource "cloudflare_record" "blog_root" {
    zone_id     = var.zone_id
    name        = "@"
    value       = aws_eip.server_ip.public_ip
    type        = "A"
    ttl         = 1
    proxied     = true

    depends_on = [
        aws_eip.server_ip,
    ]
}

resource "cloudflare_record" "blog_www" {
    zone_id     = var.zone_id
    name        = "www"
    value       = aws_eip.server_ip.public_ip
    type        = "A"
    ttl         = 1
    proxied     = true

    depends_on = [
        aws_eip.server_ip,
    ]
}
Here we have:
- The EC2 instance, that will use the ubuntu 20.04 image.
- A key pair using our public ssh key defined earlier, this is used to access the instance via SSH.
- A security group. Port 80 and 443 are open to the world for serving the web content, while port 22 will only be accessible from our local machine, using the ip defined in the
TF_VAR_my_public_up environment variable. Connections from any other IP address will be denied.
- An elastic IP for associating with your EC2 instance, that way if the instance goes down or we have to destroy it and create a new one the IP address won't change
- Cloudflare DNS records using the public IP address that gets given to the instance.
Final Steps
A quick holy trinity of terraform init, terraform plan, terraform apply and we have a fully provisioned EC2 instance only allowing the connections we want and DNS records pointing to the instance!

That's it for part1. In the next I will discuss configuring the server using ansible.
If you have any questions or would like me to go into more detail on anything discussed here please get in touch on twitter or e-mail me. Contact details be found here.
Apr 02, 2021
Welcome!
I recently started taking my hobby of tinkering with (and breaking) technology a lot more seriously and have decided to write about my experiences.
I'll be writing about any projects that I'm working on and technology that interests me.
The plan is to start with two or three posts about how I definitely didn't go overkill with the hosting of this blog... You'll have to keep reading to find out more but it involves AWS, terraform and ansible.
In the meantime, please check out my twitter and github.