Setting up an environment for a new python project
Somebody recently asked me the steps I take to setup my environment for a new python project so I thought I'd write a small post on this topic because it might be beneficial to others.
There are a lot of tools out there such a venv, pipenv and poetry for managing your python environments.
I like to use venv personally as it is built in to python and simple enough to use.
Create a git repository
Lately I always use github for any projects even if they are just personal and I want to keep them private.
You never know if at some point you'll want to make them public and the added piece of mind of having a copy of the code online is a huge benefit.
So since we are going to use github, it's easier to just create the repository on github and clone it rather than going through the dance of git init,renaming the branch to main, git remote add origin.
You also get a few added benefits such as github creating the README, .gitignore and LICENSE for you.
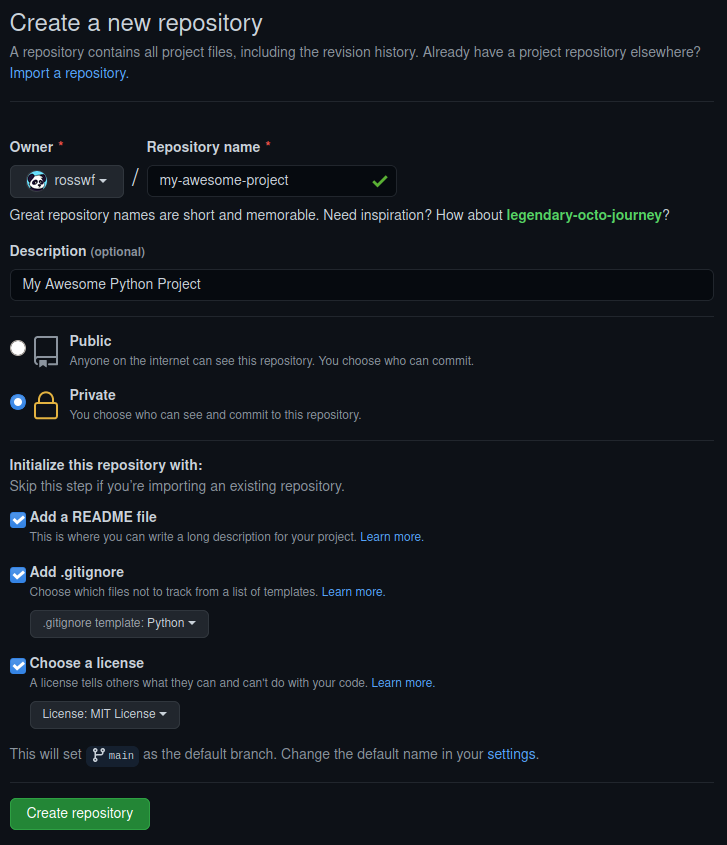
I like to use the MIT License but feel free to choose which one suits you the most.
Clone the repository
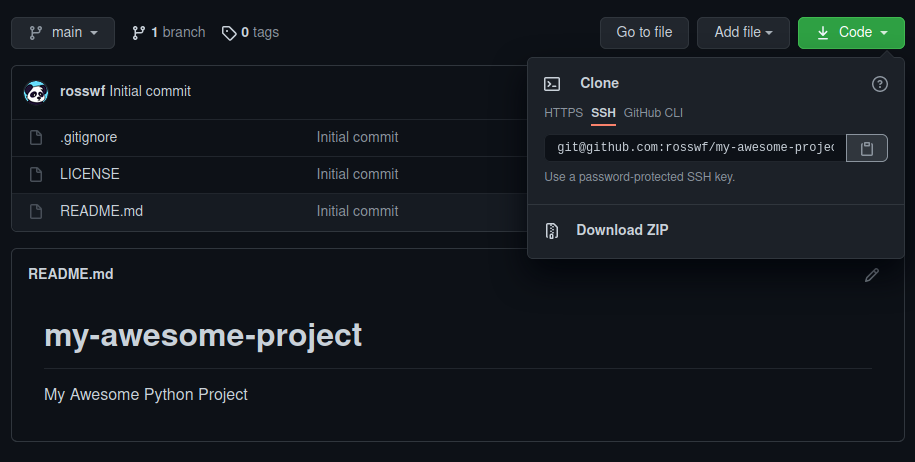
Now that we have created the repository on github it's time to clone it.
Click the green code button and copy the link. Here I am using SSH but if you don't have SSH keys setup, feel free to use HTTPS. I might cover SSH in another blog post at some point if any of you feel that would be beneficial.
Now we have the link, we just use git clone on the command line. I save all my projects in a folder in my home directory named python.
~/python$ git clone git@github.com:rosswf/my-awesome-project.git
Cloning into 'my-awesome-project'...
remote: Enumerating objects: 5, done.
remote: Counting objects: 100% (5/5), done.
remote: Compressing objects: 100% (4/4), done.
remote: Total 5 (delta 0), reused 0 (delta 0), pack-reused 0
Receiving objects: 100% (5/5), done.

~/python$ cd my-awesome-project/

~/python/my-awesome-project$ ls -l
total 67
drwxrwxr-x  3 ross ross    6 May  1 12:36 ./
drwxrwxr-x 10 ross ross   16 May  1 12:36 ../
drwxrwxr-x  8 ross ross   13 May  1 12:36 .git/
-rw-rw-r--  1 ross ross 1799 May  1 12:36 .gitignore
-rw-rw-r--  1 ross ross 1061 May  1 12:36 LICENSE
-rw-rw-r--  1 ross ross   47 May  1 12:36 README.md

~/python/my-awesome-project$ git status
On branch main
Your branch is up-to-date with 'origin/main'.

nothing to commit, working tree clean
There we go, the repository has been cloned and we can see all the files that github created for us. Using git status we can also see we are up to date with origin/main.
Creating and activating a virtual environment
Create the virtual environment
Here we are running the venv module and telling to use venv as the name for our virtual environment but feel free to change this to something else if you'd like.
~/python/my-awesome-project$ python3 -m venv venv

~/python/my-awesome-project$ ll
total 84
drwxrwxr-x  4 ross ross    7 May  1 12:41 ./
drwxrwxr-x 10 ross ross   16 May  1 12:36 ../
drwxrwxr-x  8 ross ross   13 May  1 12:38 .git/
-rw-rw-r--  1 ross ross 1799 May  1 12:36 .gitignore
-rw-rw-r--  1 ross ross 1061 May  1 12:36 LICENSE
-rw-rw-r--  1 ross ross   47 May  1 12:36 README.md
drwxrwxr-x  6 ross ross    8 May  1 12:41 venv/
We can see the venv folder has been created. Don't worry about the contents of this too much, it's basically taken a copy of the python interpreter and it's where any packages will be installed while the environment is active. The only thing that we actually need to worry about is the script for activating.
Activate the virtual environment
~/python/my-awesome-project$ source venv/bin/activate

(venv) ~/python/my-awesome-project$
You can tell it's worked because the name of the virtual environment will be added to the beginning of your shell prompt. In this case (venv).
Note that the above is for activating it on linux. If you were using command prompt on windows you would simply run the activate.bat located in the Scripts folder.
You can find more information on activating for your specific shell in the documentation
C:\python\my-awesome-project\> venv\Scripts\activate.bat
If you ever want to deactivate the virtual environment you just need to type deactivate.
That's pretty much all that's required. We now have everything we need to start writing some code:
- A git repository that we can easily push to github
- A clean virtual environment to begin installing packages
Installing packages and generating requirements.txt
Since most projects will typically use packages from PyPI next we will install the ones we require and generate a requirements.txt file which will make it easier for anybody else that wants to use our project to quickly and easily install all the required packages.
As an example I'm going to install Flask.
(venv) ~/python/my-awesome-project$ pip install flask
[...]
Installing collected packages: click, MarkupSafe, Jinja2, Werkzeug, itsdangerous, flask
Successfully installed Jinja2-2.11.3 MarkupSafe-1.1.1 Werkzeug-1.0.1 click-7.1.2 flask-1.1.2 itsdangerous-1.1.0

(venv) ~/python/my-awesome-project$ pip freeze > requirements.txt

(venv) ~/python/my-awesome-project$ cat requirements.txt
click==7.1.2
Flask==1.1.2
itsdangerous==1.1.0
Jinja2==2.11.3
MarkupSafe==1.1.1
Werkzeug==1.0.1
There we go, Flask and all of it's dependencies are installed and are now listed in our requirements.txt.
This is why a virtual environment is great! You can install just the packages and any specific versions you need for that particular project and easily generate the requirements.txt file.
Push to github
Although we haven't written any code yet I'm going commit and push the requirements.txt to github.
(venv) ~/python/my-awesome-project$ git add requirements.txt

(venv) ~/python/my-awesome-project$ git commit -m "Add requirements.txt"
[main aa1b945] Add requirements.txt
 1 file changed, 6 insertions(+)
 create mode 100644 requirements.txt

(venv) ~/python/my-awesome-project$ git push
Enumerating objects: 4, done.
Counting objects: 100% (4/4), done.
Delta compression using up to 8 threads
Compressing objects: 100% (3/3), done.
Writing objects: 100% (3/3), 356 bytes | 356.00 KiB/s, done.
Total 3 (delta 1), reused 0 (delta 0), pack-reused 0
remote: Resolving deltas: 100% (1/1), completed with 1 local object.
To github.com:rosswf/my-awesome-project.git
   1ba307f..aa1b945  main -> main
The above pattern is how files that have been added or modified would be committed and pushed to the repository:
git add <files>- Stage the files ready to be committedgit commit -m "My sensible commit message"- Commit the files with a sensible messagegit push- Push to github
git status is also an extremely useful command. Try running this before each of the steps above and see what the output is.
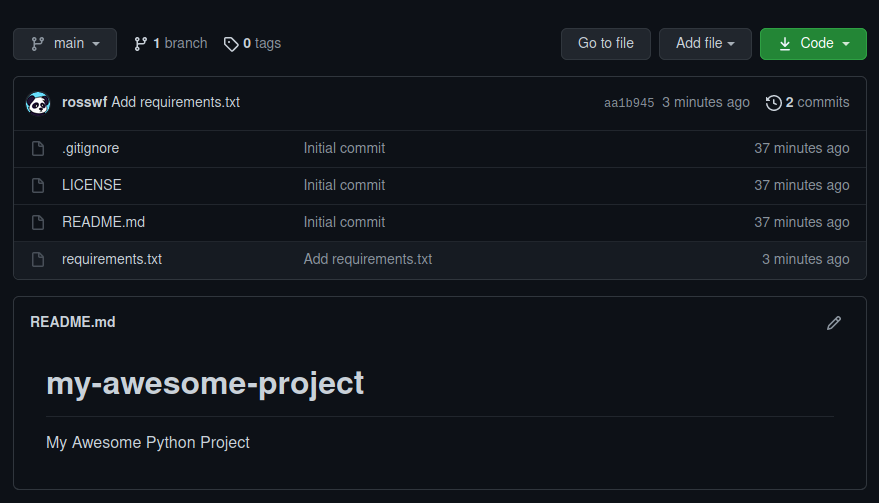
After checking our repo on github we can see that the requirements.txt file is there along with our commit message!
Summary
Hopefully the above was useful in helping you get setup with a clean environment for the next python project you are working on.
As I mentioned at the start there are numerous ways to go about this with all sorts of different tools created by the community.
Let me know what you use! Contact details be found here.