PyCon US 2021 was online this year due to the current global situation so I thought I'd take advantage of this opportunity to virtually attend as it's unlikely I'll be able to attend future US conferences in person.
I've never attended a conference before either in person or online so I want to give my thoughts on conferences as a newbie.
All of the talks I was able to watch live were fantastic but some definitely stood out to me so I'm going to give my thoughts on these. There were multiple tracks so unfortunately I didn't get to watch all the talks I wanted to see live as there were some scheduling clashes, sometimes 3 at a time! This should give you an idea of how interesting the talks were.
Overview
Obviously with this being online I wasn't able to get the full conference experience but it was a great opportunity to dip my toe in the water and see if it was something that I would like to experience in person in the future.
I primarily just watched the talks however the online platform they used was great, after each talk there was an opportunity to join a virtual room with the person that gave the talk for a live Q&A session and there was a live chat during the talk to ask questions and engage with other members of the community.
There were also lounges for networking and sponsor booths where you could drop in to ask questions through out the entirety of the event.
The online experience has definitely wet my appetite for attending something like this in person in future to get the full in person experience - I'm looking at you PyCon UK!
Highlights
As I mentioned earlier all of the talks were great but these are some of the ones that stood out to me in particular.
Day 1 Keynote - Robert Erdmann
Robert Erdmann has been using python to create an extremely high resolution image of Rembrandt's Night Watch painting. The final image will be 925,000px x 775,000px, that translates to each pixel representing 5 µm of the painting.
This image has not been released to the public yet but there is a 20 µm version available which in itself is incredible so I cannot wait to see the new higher resolution version!
The number of moving parts involved in producing these images was mind blowing. Here are just a few:
- Due to the operating range of the camera to retrieve a sharp image was so small that he first had to produce a 3D scan of the painting to take into account it's topology. This allowed them to adjust the position and angle of the camera to get a sharp image.
- The use of machine learning to assess the quality of each image.
- ML to stitch the final image together, skewing each individual photograph as required and decided which image to use where pixel values were contested due to overlaps.
The talk needs to be seen purely to see how python as a programming language can be utilised for so many different aspects of a project from controlling the position of the camera to performing analysis on each image.
From 3 to 300 fps: NES Emulation in Python and Cython - James Murphy
I didn't expect to enjoy this talk quite as much as I did but it was a great insight into just how flexible python is (I'd never expected it to be able to be used for an emulator) and how it can be optimised using the likes of Cython to see huge performance gains.
The finished emulator using CPython at first only ran at 2-3 fps but after a few days of optimisation utilising Cython it was running at over 300 fps. These performance gains are astonishing, it shows just how versatile python can be and that "python is slow" might not always be true with a little extra work.
Intro to Pydantic, run-time type checking for your dataclasses - Alexander Hultnér
I'd heard of pydantic but it's not something I've got round to exploring yet. Alexander's talk was a fantastic introduction and really engaging. He used a very basic example of a Waffle House to clearly portray the benefits and uses of pydantic.
JSON is a first class citizen in pydantic and Alexander demonstrated how it can be utilised for creating APIs. It's definitely a tool that I'm going to utilise in the near future, most likely with Fast API which I will come onto next!
If like me you have heard of pydantic and aren't sure what it's about, why you might need it and how it can be used I'd definitely recommend checking out this talk. Alexander does a great job of explaining it in a beginner friendly manner which makes it feel much less daunting for getting started with.
An Introduction to FastAPI - Thomas Jewitt
FastAPI is something that I've been aware of for a while and the general consensus was that is is the next big thing but I wasn't entirely sure why it was so amazing. Thomas did a great job of explaining the features & benefits of FastAPI and how quick it is to get up and running.
Some of the stand out features to me were:
- It's use of pydantic for validation.
- Automatic generation of documentation based on the OpenAPI specification.
- It's pythonic as it utilises pythons type hinting.
This talk has definitely given me the push to bump FastAPI further up my ever growing list of things to learn and try.
I don't think this will completely replace Flask in the web framework world as they seem to fill different niches.
If you are going to use a front-end framework such as React or Vue it definitely makes sense to go with FastAPI but if you just want to build a web app with python, HTML, CSS and JS then I'd say Flask still has it's place. This opinion might change once I start using FastAPI but only time will tell. Let me know what your thoughts are.
Final Thoughts
I thoroughly enjoyed PyCon US 2021 even if I didn't take advantage of everything that was available. There was a large variety of talks and some that I didn't get to watch live due to scheduling clashes but I definitely intend to watch these at a later date.
It's made me excited for next year and being able to attend conferences in person when things return to normal.
Did you attend PyCon US 2021? If so, let me know which your favourite talks were and why! Contact details be found here.
Somebody recently asked me the steps I take to setup my environment for a new python project so I thought I'd write a small post on this topic because it might be beneficial to others.
There are a lot of tools out there such a venv, pipenv and poetry for managing your python environments.
I like to use venv personally as it is built in to python and simple enough to use.
Create a git repository
Lately I always use github for any projects even if they are just personal and I want to keep them private.
You never know if at some point you'll want to make them public and the added piece of mind of having a copy of the code online is a huge benefit.
So since we are going to use github, it's easier to just create the repository on github and clone it rather than going through the dance of git init,renaming the branch to main, git remote add origin.
You also get a few added benefits such as github creating the README, .gitignore and LICENSE for you.
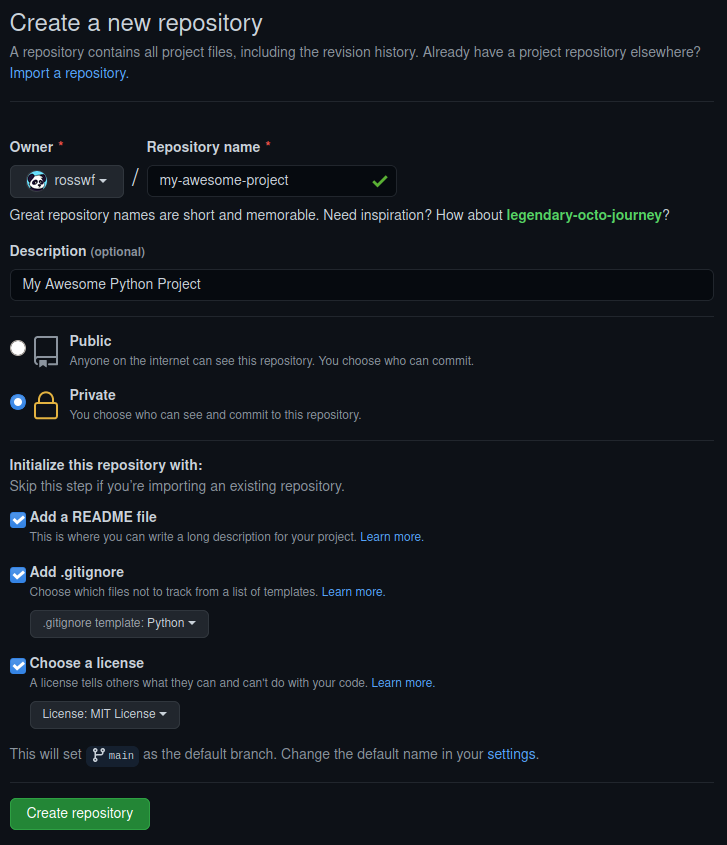
I like to use the MIT License but feel free to choose which one suits you the most.
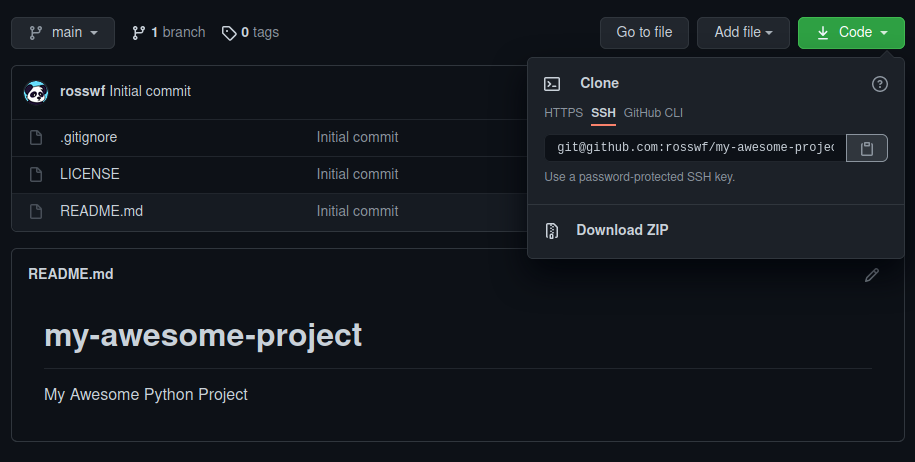
Clone the repository
Now that we have created the repository on github it's time to clone it.
Click the green code button and copy the link. Here I am using SSH but if you don't have SSH keys setup, feel free to use HTTPS. I might cover SSH in another blog post at some point if any of you feel that would be beneficial.
Now we have the link, we just use git clone on the command line. I save all my projects in a folder in my home directory named python.
~/python$ git clone git@github.com:rosswf/my-awesome-project.git
Cloning into 'my-awesome-project'...
remote: Enumerating objects: 5, done.
remote: Counting objects: 100% (5/5), done.
remote: Compressing objects: 100% (4/4), done.
remote: Total 5 (delta 0), reused 0 (delta 0), pack-reused 0
Receiving objects: 100% (5/5), done.

~/python$ cd my-awesome-project/

~/python/my-awesome-project$ ls -l
total 67
drwxrwxr-x  3 ross ross    6 May  1 12:36 ./
drwxrwxr-x 10 ross ross   16 May  1 12:36 ../
drwxrwxr-x  8 ross ross   13 May  1 12:36 .git/
-rw-rw-r--  1 ross ross 1799 May  1 12:36 .gitignore
-rw-rw-r--  1 ross ross 1061 May  1 12:36 LICENSE
-rw-rw-r--  1 ross ross   47 May  1 12:36 README.md

~/python/my-awesome-project$ git status
On branch main
Your branch is up-to-date with 'origin/main'.

nothing to commit, working tree clean
There we go, the repository has been cloned and we can see all the files that github created for us. Using git status we can also see we are up to date with origin/main.
Creating and activating a virtual environment
Create the virtual environment
Here we are running the venv module and telling to use venv as the name for our virtual environment but feel free to change this to something else if you'd like.
~/python/my-awesome-project$ python3 -m venv venv

~/python/my-awesome-project$ ll
total 84
drwxrwxr-x  4 ross ross    7 May  1 12:41 ./
drwxrwxr-x 10 ross ross   16 May  1 12:36 ../
drwxrwxr-x  8 ross ross   13 May  1 12:38 .git/
-rw-rw-r--  1 ross ross 1799 May  1 12:36 .gitignore
-rw-rw-r--  1 ross ross 1061 May  1 12:36 LICENSE
-rw-rw-r--  1 ross ross   47 May  1 12:36 README.md
drwxrwxr-x  6 ross ross    8 May  1 12:41 venv/
We can see the venv folder has been created. Don't worry about the contents of this too much, it's basically taken a copy of the python interpreter and it's where any packages will be installed while the environment is active. The only thing that we actually need to worry about is the script for activating.
Activate the virtual environment
~/python/my-awesome-project$ source venv/bin/activate

(venv) ~/python/my-awesome-project$
You can tell it's worked because the name of the virtual environment will be added to the beginning of your shell prompt. In this case (venv).
Note that the above is for activating it on linux. If you were using command prompt on windows you would simply run the activate.bat located in the Scripts folder.
You can find more information on activating for your specific shell in the documentation
C:\python\my-awesome-project\> venv\Scripts\activate.bat
If you ever want to deactivate the virtual environment you just need to type deactivate.
That's pretty much all that's required. We now have everything we need to start writing some code:
- A git repository that we can easily push to github
- A clean virtual environment to begin installing packages
Installing packages and generating requirements.txt
Since most projects will typically use packages from PyPI next we will install the ones we require and generate a requirements.txt file which will make it easier for anybody else that wants to use our project to quickly and easily install all the required packages.
As an example I'm going to install Flask.
(venv) ~/python/my-awesome-project$ pip install flask
[...]
Installing collected packages: click, MarkupSafe, Jinja2, Werkzeug, itsdangerous, flask
Successfully installed Jinja2-2.11.3 MarkupSafe-1.1.1 Werkzeug-1.0.1 click-7.1.2 flask-1.1.2 itsdangerous-1.1.0

(venv) ~/python/my-awesome-project$ pip freeze > requirements.txt

(venv) ~/python/my-awesome-project$ cat requirements.txt
click==7.1.2
Flask==1.1.2
itsdangerous==1.1.0
Jinja2==2.11.3
MarkupSafe==1.1.1
Werkzeug==1.0.1
There we go, Flask and all of it's dependencies are installed and are now listed in our requirements.txt.
This is why a virtual environment is great! You can install just the packages and any specific versions you need for that particular project and easily generate the requirements.txt file.
Push to github
Although we haven't written any code yet I'm going commit and push the requirements.txt to github.
(venv) ~/python/my-awesome-project$ git add requirements.txt

(venv) ~/python/my-awesome-project$ git commit -m "Add requirements.txt"
[main aa1b945] Add requirements.txt
 1 file changed, 6 insertions(+)
 create mode 100644 requirements.txt

(venv) ~/python/my-awesome-project$ git push
Enumerating objects: 4, done.
Counting objects: 100% (4/4), done.
Delta compression using up to 8 threads
Compressing objects: 100% (3/3), done.
Writing objects: 100% (3/3), 356 bytes | 356.00 KiB/s, done.
Total 3 (delta 1), reused 0 (delta 0), pack-reused 0
remote: Resolving deltas: 100% (1/1), completed with 1 local object.
To github.com:rosswf/my-awesome-project.git
   1ba307f..aa1b945  main -> main
The above pattern is how files that have been added or modified would be committed and pushed to the repository:
git add <files> - Stage the files ready to be committedgit commit -m "My sensible commit message" - Commit the files with a sensible messagegit push - Push to github
git status is also an extremely useful command. Try running this before each of the steps above and see what the output is.
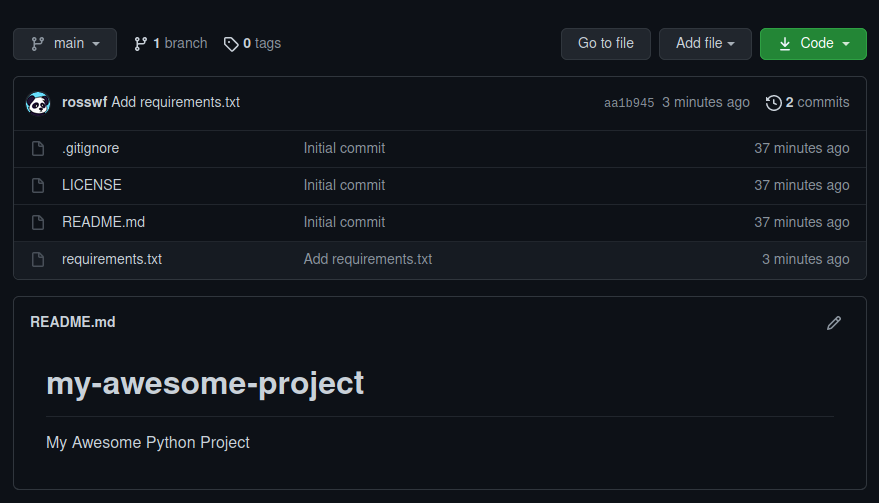
After checking our repo on github we can see that the requirements.txt file is there along with our commit message!
Summary
Hopefully the above was useful in helping you get setup with a clean environment for the next python project you are working on.
As I mentioned at the start there are numerous ways to go about this with all sorts of different tools created by the community.
Let me know what you use! Contact details be found here.