Aug 08, 2021
Recently, I have seen a number of people looking for hosting for their discord bots. Many people go to services like Heroku, but if you would like full VPS and full control, then AWS is a great option, especially since there is a free tier for one year. However, AWS has a lot of different products and the UI can be a little overwhelming so I thought I would write a quick brief guide on how to get started. This, however, is by no means a deep dive into all the features/products of AWS.
Getting Started
The first thing you need to do is head over to AWS and create an account. This is not the same account that you would use for Amazon's website so you will need to create a new one. Make sure you setup 2FA as well.
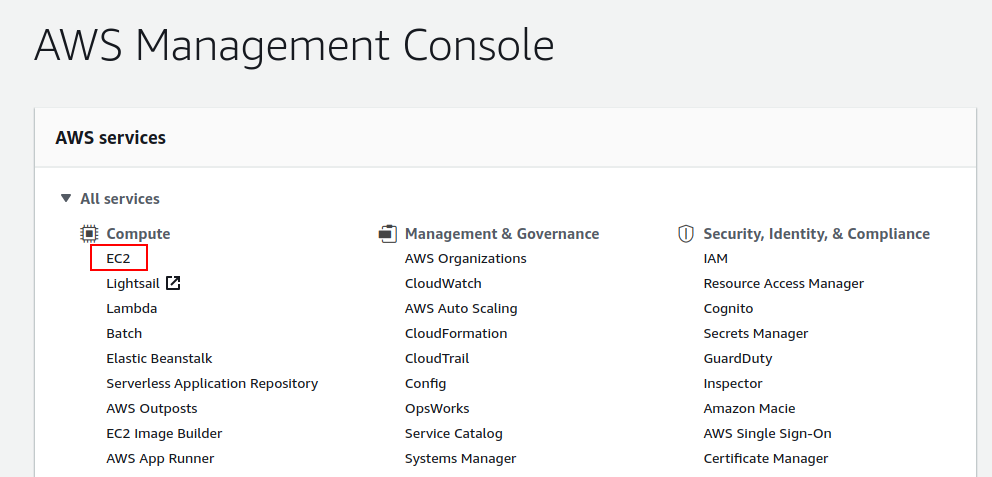
Once you have your account and are logged in, head over to the management console and under All Services->Compute, select EC2. This is basically amazon's name for a VPS, similar to a droplet on DigitalOcean.
Note: If you wish to change the region, you can do so in the top right, next to your account name. It would make sense to do this now before creating your EC2 instance.
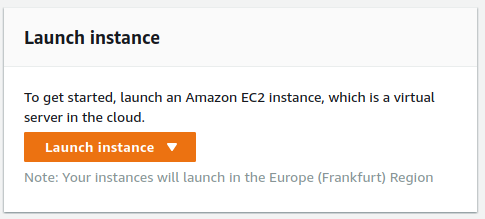
Launch instance
The EC2 Dashboard can seem very overwhelming at first as there are a lot of options, but the only thing we need right now is the big orange "Launch instance" button.
Step 1: Choose an Amazon Machine Image (AMI)
The first step is selecting which operating system you would like to run on your EC2 instance. Make sure you choose one that is "Free tier eligible" if you want to take advantage of that for 12 months. For the purpose of this guide, I'm going to go with Ubuntu Server 20.04 LTS. If you are new to Linux, it is a great option as there are many learning resources available online; I'd definitely recommend it for getting started.

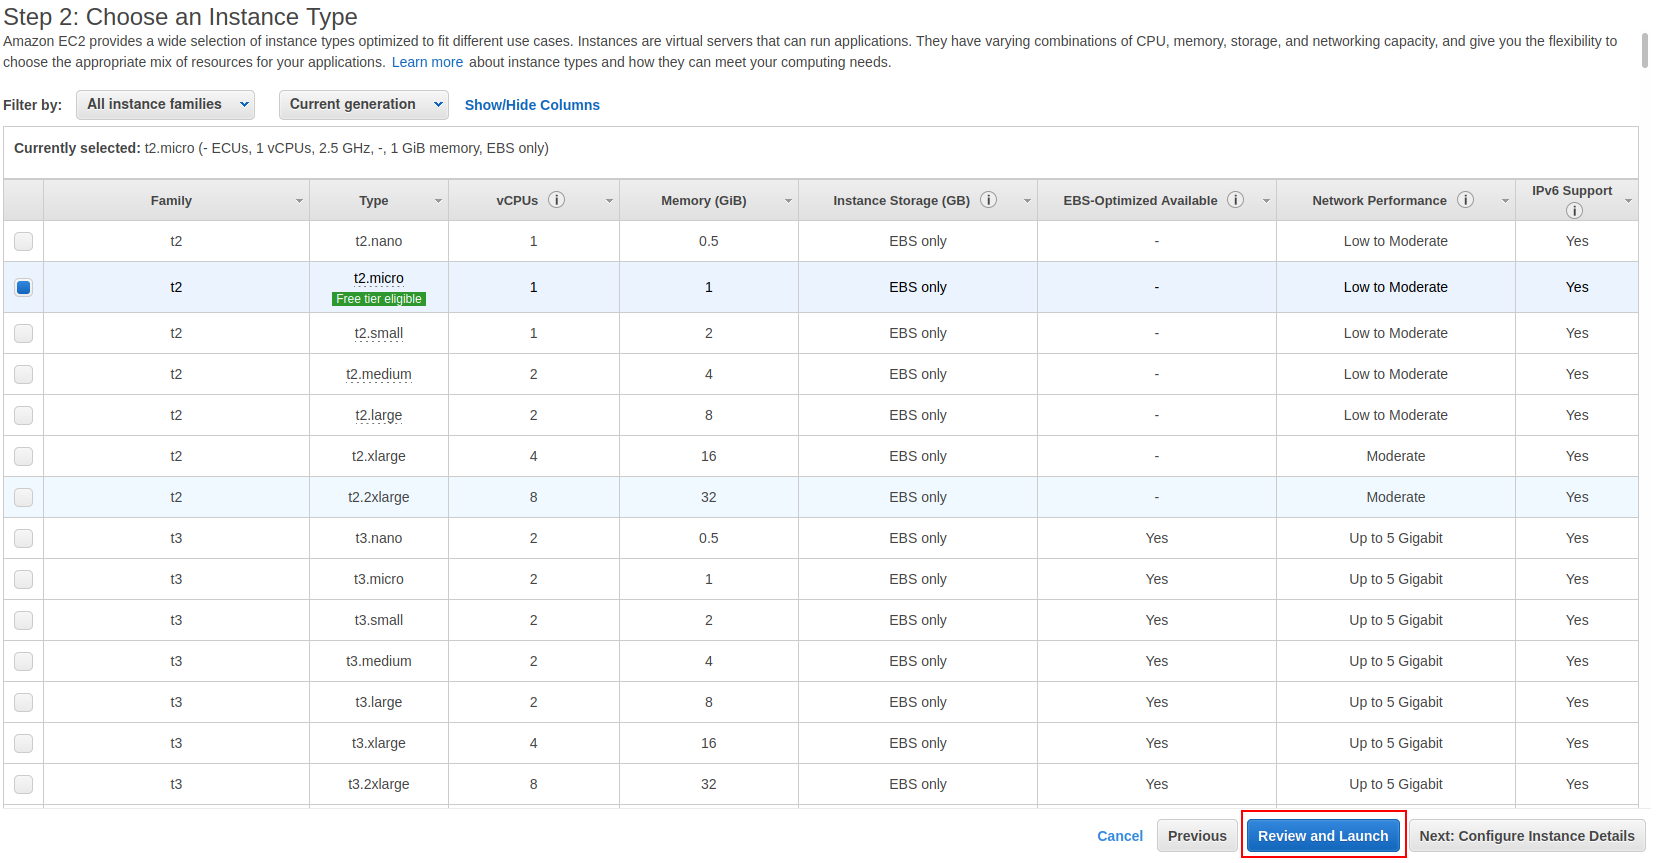
Step 2: Choose an Instance Type
Next we choose our instance type. There are plenty of options here (everything on AWS seems to be overwhelming!). For getting started, choose the t2.micro as this is free tier eligible and has 1gb of RAM which will be plenty for starting out. You can always upgrade later to one of the other instance types if your needs require it.
Depending on what you are planning to run on your VPS, you can probably now just click the big blue "Review and Launch" button. This would be suitable for anything that doesn't require an inbound connection, such as a discord bot. However, if you want to host a website, see the optional step below.
If you do not require any inbound connection other than SSH, you can skip the next step and just click the "Review and Launch" button.
Note: One thing that could be done to restrict access is to change the security group settings so that SSH is only accessible from your own IP address rather than the entire world
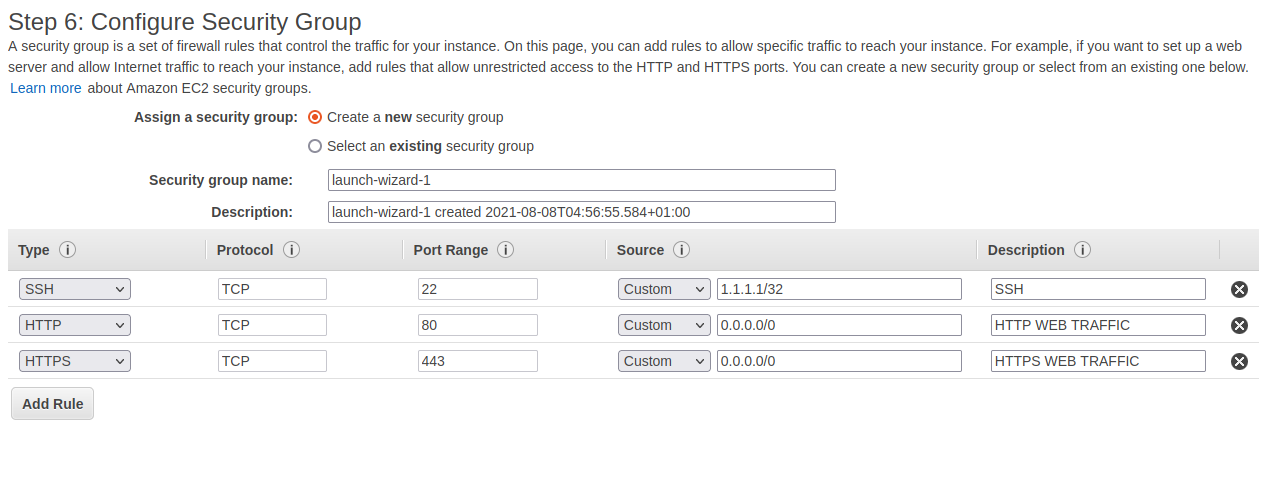
Optional: Step 6: Configure Security Group
Skip ahead to step 6 of the configuration. This is where you can configure the security group. This is basically the firewall and defines which ports are open and where they can be accessed from. The change mentioned above about restricting SSH to your own IP can be done here. Simply change the Source to your own IP. For example: If your IP address was 1.1.1.1, you would enter "1.1.1.1/32".
Here are some example options that would allow HTTP/HTTPS web traffic and a connection from SSH only on my own IP, shown as 1.1.1.1 as an example. Make sure you replace this with your own.
Launch!
Once you've completed the steps above, click "Review and Launch".
Make sure you are happy with all your choices, then click "Launch".
SSH Keys
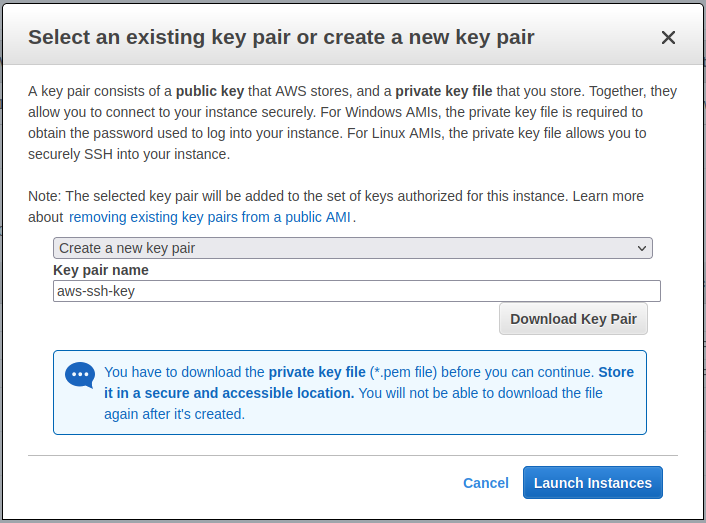
You will now be prompted to create an SSH key pair for accessing the EC2 instance. Choose "Create a new key pair" and give it a name, then click "Download Key Pair".
Make sure you save this somewhere secure and not lose it. If you do, you will no longer be able to gain access via SSH.
Note: I'm not going to go into using SSH and keys as it is outside of the scope of this guide. However, here is a guide for using PuTTY on Windows with the key
pair you have just downloaded.
Once you have downloaded the key and saved it somewhere safe, click Launch Instances.
Launched!
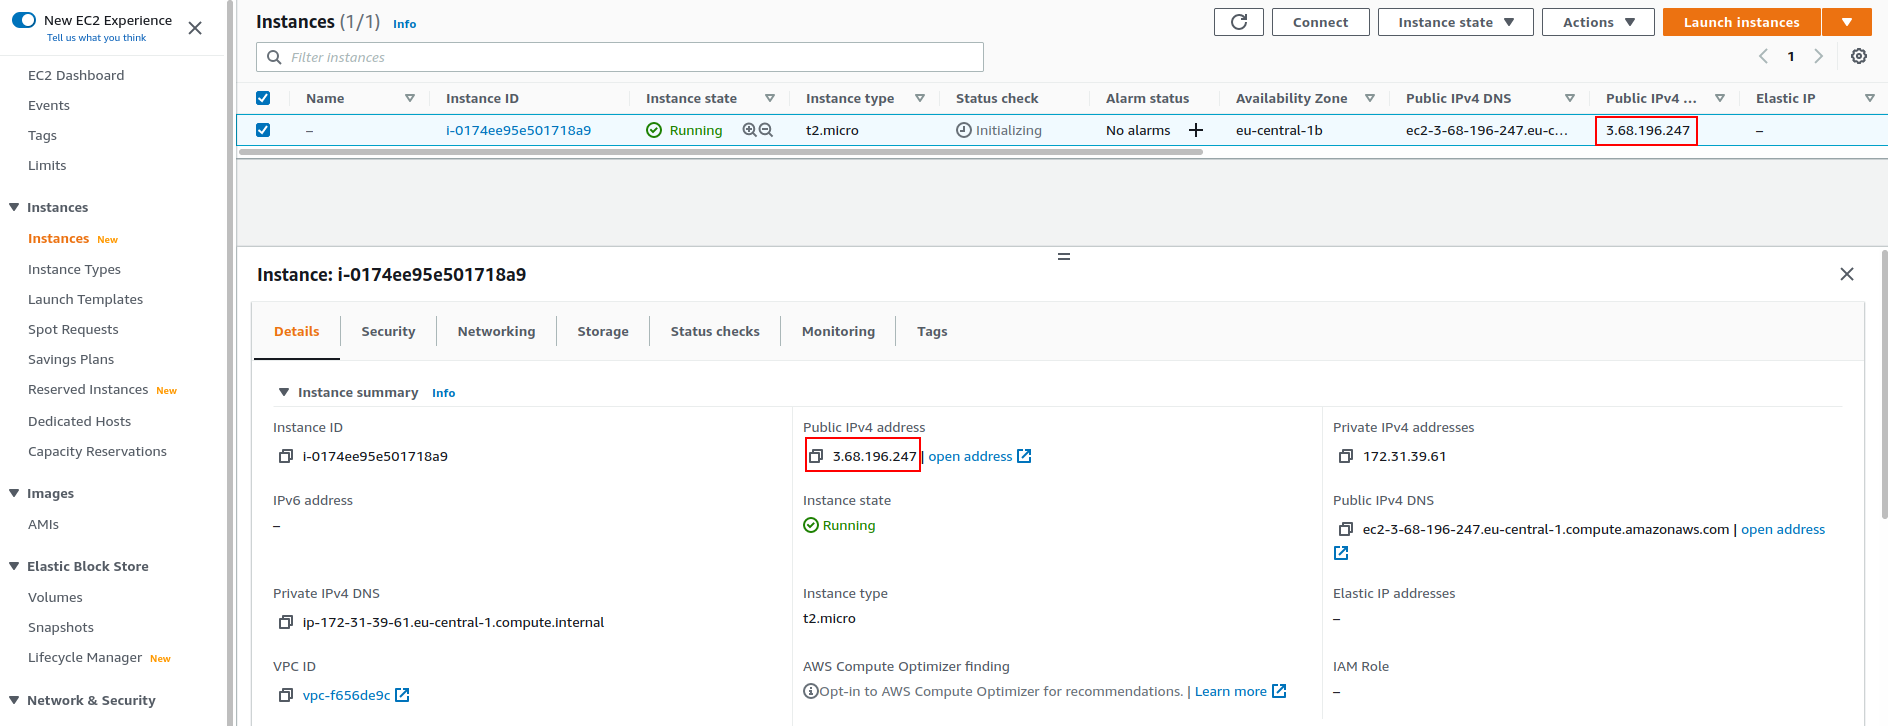
You can now go back to your dashboard and choose instances on the navigation panel. You should see your instance and its status. Once it is running, we can connect via SSH. You can click on it for further details in the panel below.
To connect, you will need to make note of the Public IPv4 Address. This can be seen in the instance list at the top or within the details tab if you select the instance.
Connecting
Let's connect by SSH. The default user is ubuntu if you chose Ubuntu Server, and your IP address can be found on the AWS web console as mentioned above
$ ssh ubuntu@3.68.196.247 -i aws-key-pair.pem
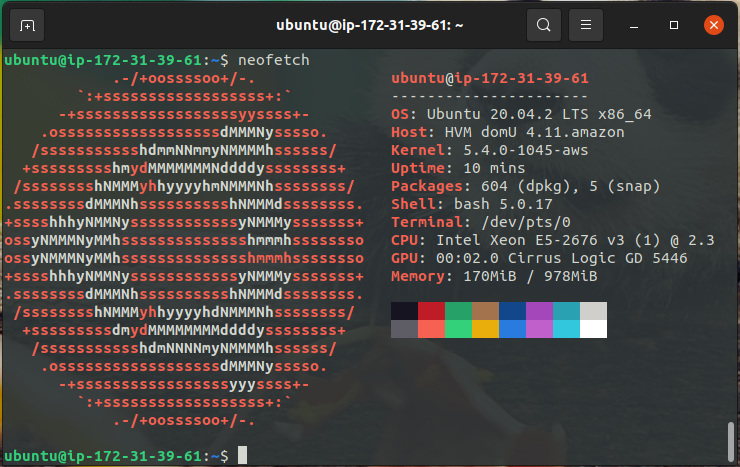
All connected via SSH!
Summary
Hopefully, this guide was easy to follow. AWS is definitely overwhelming at first and there is still a lot I need to learn about it, but as you can see, it's really straight forward to set up with a basic VPS that you can run whatever you need to.
If any of you have any further questions or suggestions, please get in touch! Contact details be found here.
May 22, 2021
Today, I'm going to be telling you about my small homelab which I started putting together only in November last year. I don't have much space and wanted something quiet and power-efficient. The HPE MicroServer Gen8 seemed very popular online and could be picked up relatively cheaply on the second hand market, but the hardware seems to be showing its age. After a bit of research and an incredible review by ServeTheHome, I settled on starting out with the HPE MicroServer Gen10 Plus.
Hardware
HPE MicroServer Gen10 Plus
- CPU: Intel Xeon E-2224
- RAM: 32gb DDR4-2226 ECC (Upgraded from the standard 16gb)
- OS Storage: WD Blue 500gb NVME (PCIe card required)
- Bulk Storage: 4x 4TB WD Red Plus SATA
The specs are nothing to write home about but it is perfect for my needs (for now) and the form factor is great; it easily fits on a bookshelf. I also purchased the iLO enablement kit which is required to utilise iLO on this particular model.
Raspberry Pis
I have a cluster of 4 Raspberry Pi 4B's that used to act as my home lab before I bought something a bit more robust in the MicroServer. My intention for these is to set them up in a kubernetes cluster as workers. I'll probably need to run the master in a virtual machine as they just won't have enough memory for that, but they should be perfectly fine as workers.
Network Gear
Right now, I have a fairly cheap ethernet switch and a wireless access point. I am looking to upgrade to a managed switch in the future so if anybody has any recommendations, please let me know!
UPS - Cyberpower 1500VA/900W
I chose this one because it wasn't too expensive compared to the other options out there. It gives me plenty of headroom for what I need and also has x2no regular UK plug outlets alongside the x4 EIC C13 which is great for connecting my modem, network switch, and other items that just have a plug.
It comes with software that allows it to send a shutdown signal to a device if the power is out for a certain amount of time. My server runs 24/7 and being able to have it cleanly shut down if there is a power outage while I'm away or sleeping provides me with peace of mind, which is great.
The other benefit of a UPS is it always ensures that any connected devices have clean power.
Software
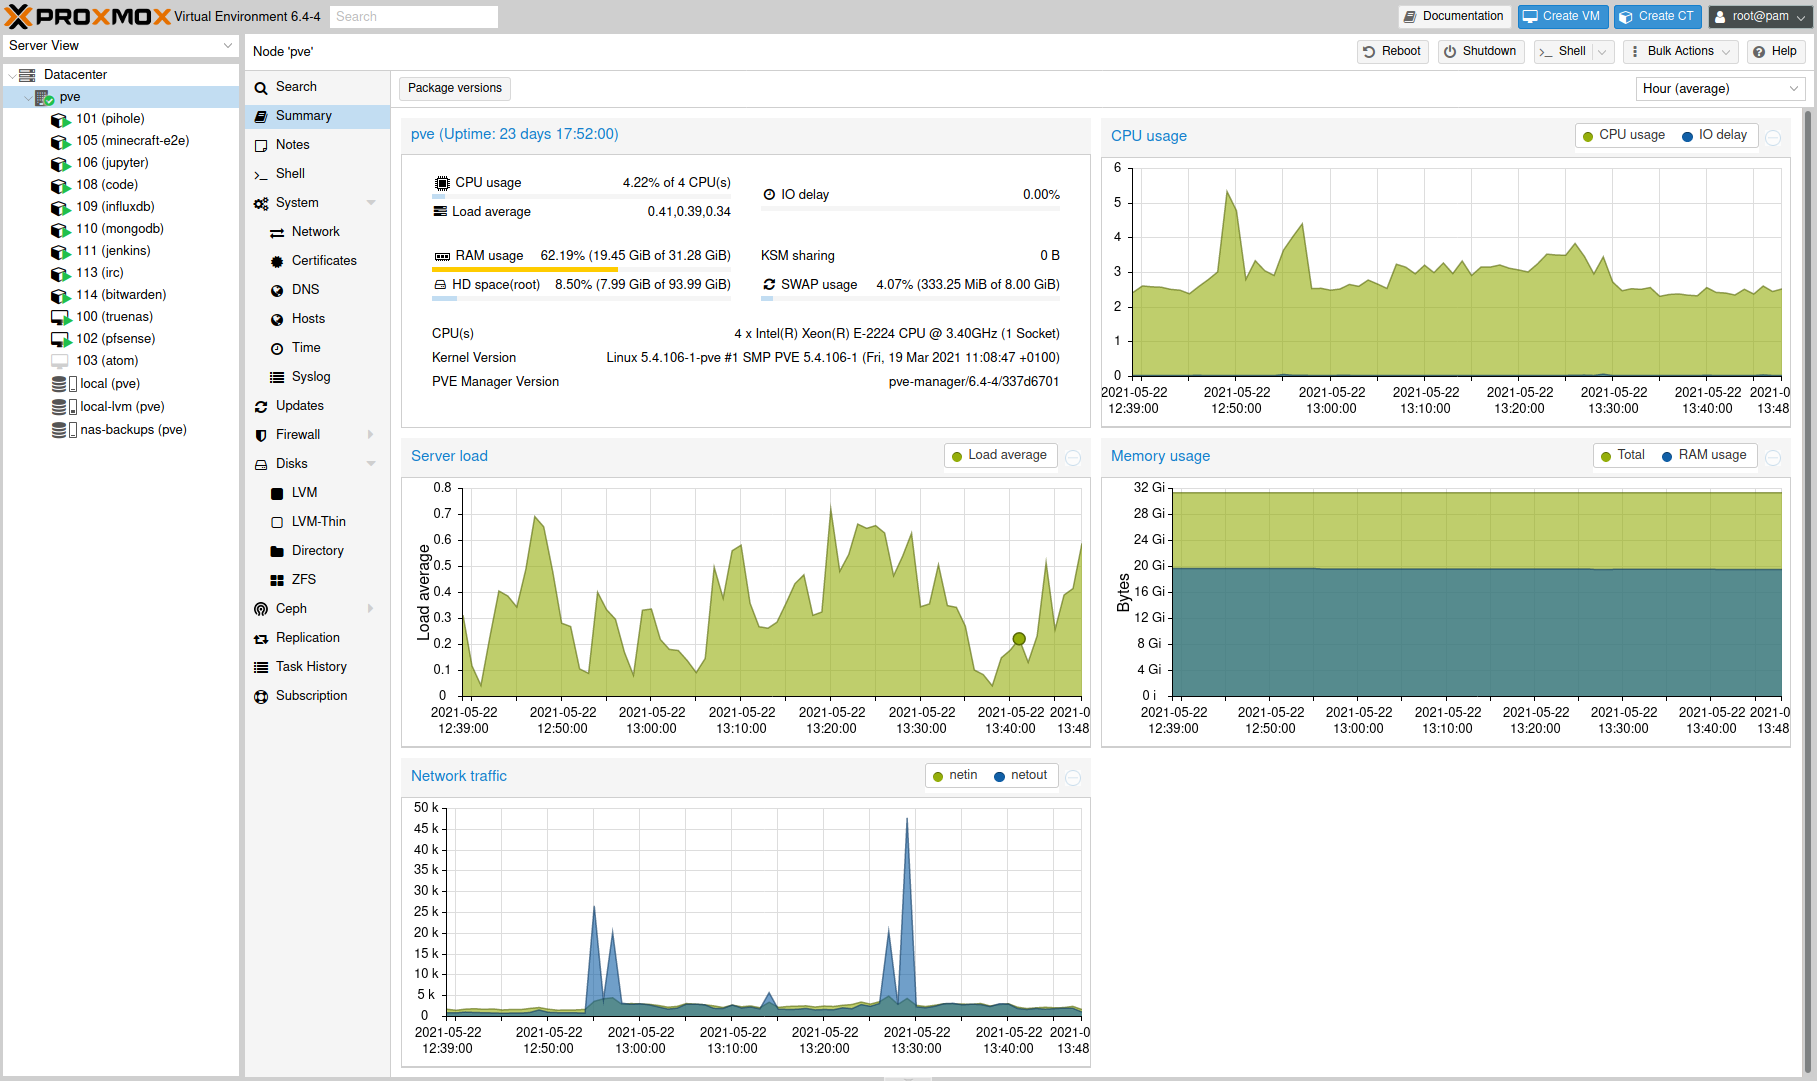
I'm running Proxmox VE as the OS on the MicroServer. I’ve never used this kind of hypervisor before, but I have found proxmox really easy to get up and running with. There are a whole host of advanced features that I haven't had a chance to dive into yet.
There are a number of Virtual Machines and LXC Containers that form my homelab:
Virtual Machines
- truenas - This runs TrueNAS Core with the 4x 4TB hard drives passed through to it and serves as my home NAS.
- pfsense - This runs pfSense Community Edition. I've talked about this in some previous posts where I've discussed setting up OpenVPN and network booting Ubuntu 21.04.
- atom - This isn't running anything specialised, it's just a standard Ubuntu Server 20.04 VM. I use it mainly for testing, at the moment it's mainly used as a bit of a docker playground.
Containers
I try to keep everything in its own single container so that if there are ever any issues, I can just kill the container and create a new one from backup. It makes configuration way more straight forward.
- pihole - A container that just runs pihole for DNS level ad-blocking across my entire network and is also used as DNS for all of my local infrastructure. As an example, I can access truenas by navigating to https://truenas.rossw.co.uk.
- minecraft-e2e - A container running a small minecraft server for some friends.
- jupyter - A container running JupyterLab for easy access to notebooks from any of my devices.
- code - A container running VS Code Server which allows access to VS Code from a browser. I don't really use this as much as I used to, but it is handy for not having to configure and install plugins on a device that I'm going to be using infrequently. It is also nice for getting access to a bash shell on devices that don't support that.
- influxdb - A container running an instance of InfluxDB. I'm currently using this to store temperature data for a project I'm working on where I have a raspberry pi hooked up to a temperature sensor and then a Flask app to display the data. I'm planning to rewrite this project entirely using FastAPI instead of Flask with a JS framework front-end (most likely Vue). Watch this space for updates!
- mongodb - A container running an instance of MongoDB. I'm not really using this at the moment, I had set it up for use with a project but that is on the back burner right now. It'll get some use eventually.
- jenkins - A container running jenkins, at the moment it is responsible for building and deploying this blog whenever there are any updates! I intend to write about this later in my blog series on deploying this Blog. You can check out part 1 now which covers provisioning using terraform.
- irc - A container running WeeChat for the few times that I do use IRC. I use Glowing Bear as a front end so I can access it from any device. I would definitely recommend this setup for anybody that regularly uses IRC.
- bitwarden - I have only recently set this up with the intention of using it to self host bitwarden and still needs some work, but once it is up and running, I'll be writing a blog post about it. I have written about setting up OpenVPN on pfSense so that once it is all set up, I can access it from anywhere.
Summary
Well that's everything I'm running! As you can see from the dashboard, I still have a bit of headroom available and have plans in the future to look into setting up Traefik, getting a proper Kubernetes setup going, and some sort of smart home automation.
If any of you have a homelab or can recommend anything that's worth self hosting, please get in touch! Contact details be found here.
May 16, 2021
PyCon US 2021 was online this year due to the current global situation so I thought I'd take advantage of this opportunity to virtually attend as it's unlikely I'll be able to attend future US conferences in person.
I've never attended a conference before either in person or online so I want to give my thoughts on conferences as a newbie.
All of the talks I was able to watch live were fantastic but some definitely stood out to me so I'm going to give my thoughts on these. There were multiple tracks so unfortunately I didn't get to watch all the talks I wanted to see live as there were some scheduling clashes, sometimes 3 at a time! This should give you an idea of how interesting the talks were.
Overview
Obviously with this being online I wasn't able to get the full conference experience but it was a great opportunity to dip my toe in the water and see if it was something that I would like to experience in person in the future.
I primarily just watched the talks however the online platform they used was great, after each talk there was an opportunity to join a virtual room with the person that gave the talk for a live Q&A session and there was a live chat during the talk to ask questions and engage with other members of the community.
There were also lounges for networking and sponsor booths where you could drop in to ask questions through out the entirety of the event.
The online experience has definitely wet my appetite for attending something like this in person in future to get the full in person experience - I'm looking at you PyCon UK!
Highlights
As I mentioned earlier all of the talks were great but these are some of the ones that stood out to me in particular.
Day 1 Keynote - Robert Erdmann
Robert Erdmann has been using python to create an extremely high resolution image of Rembrandt's Night Watch painting. The final image will be 925,000px x 775,000px, that translates to each pixel representing 5 µm of the painting.
This image has not been released to the public yet but there is a 20 µm version available which in itself is incredible so I cannot wait to see the new higher resolution version!
The number of moving parts involved in producing these images was mind blowing. Here are just a few:
- Due to the operating range of the camera to retrieve a sharp image was so small that he first had to produce a 3D scan of the painting to take into account it's topology. This allowed them to adjust the position and angle of the camera to get a sharp image.
- The use of machine learning to assess the quality of each image.
- ML to stitch the final image together, skewing each individual photograph as required and decided which image to use where pixel values were contested due to overlaps.
The talk needs to be seen purely to see how python as a programming language can be utilised for so many different aspects of a project from controlling the position of the camera to performing analysis on each image.
From 3 to 300 fps: NES Emulation in Python and Cython - James Murphy
I didn't expect to enjoy this talk quite as much as I did but it was a great insight into just how flexible python is (I'd never expected it to be able to be used for an emulator) and how it can be optimised using the likes of Cython to see huge performance gains.
The finished emulator using CPython at first only ran at 2-3 fps but after a few days of optimisation utilising Cython it was running at over 300 fps. These performance gains are astonishing, it shows just how versatile python can be and that "python is slow" might not always be true with a little extra work.
Intro to Pydantic, run-time type checking for your dataclasses - Alexander Hultnér
I'd heard of pydantic but it's not something I've got round to exploring yet. Alexander's talk was a fantastic introduction and really engaging. He used a very basic example of a Waffle House to clearly portray the benefits and uses of pydantic.
JSON is a first class citizen in pydantic and Alexander demonstrated how it can be utilised for creating APIs. It's definitely a tool that I'm going to utilise in the near future, most likely with Fast API which I will come onto next!
If like me you have heard of pydantic and aren't sure what it's about, why you might need it and how it can be used I'd definitely recommend checking out this talk. Alexander does a great job of explaining it in a beginner friendly manner which makes it feel much less daunting for getting started with.
An Introduction to FastAPI - Thomas Jewitt
FastAPI is something that I've been aware of for a while and the general consensus was that is is the next big thing but I wasn't entirely sure why it was so amazing. Thomas did a great job of explaining the features & benefits of FastAPI and how quick it is to get up and running.
Some of the stand out features to me were:
- It's use of pydantic for validation.
- Automatic generation of documentation based on the OpenAPI specification.
- It's pythonic as it utilises pythons type hinting.
This talk has definitely given me the push to bump FastAPI further up my ever growing list of things to learn and try.
I don't think this will completely replace Flask in the web framework world as they seem to fill different niches.
If you are going to use a front-end framework such as React or Vue it definitely makes sense to go with FastAPI but if you just want to build a web app with python, HTML, CSS and JS then I'd say Flask still has it's place. This opinion might change once I start using FastAPI but only time will tell. Let me know what your thoughts are.
Final Thoughts
I thoroughly enjoyed PyCon US 2021 even if I didn't take advantage of everything that was available. There was a large variety of talks and some that I didn't get to watch live due to scheduling clashes but I definitely intend to watch these at a later date.
It's made me excited for next year and being able to attend conferences in person when things return to normal.
Did you attend PyCon US 2021? If so, let me know which your favourite talks were and why! Contact details be found here.
May 08, 2021
VS Code is a fantastic text editor and has gained an incredible amount of popularity.
I imagine most of you reading this probably use VS Code.
It has a huge ecosystem of extensions, isn't better suited for one language over another and runs on pretty much all platforms.
So as a bit more of a fun post this week here are my top 5 VS Code extensions (in no particular order) and why I love them.
Vim
Most of you probably know what vim is, what this extension does it add vim functionality to VS Code. It can be a bit overwhelming at first but once you get used to it navigating & editing files becomes much quicker than clicking around with your mouse or using your arrow keys to navigate.
I would definitely recommend that you give this a go, there is a bit of a learning curve but stick with it and you won't regret it!
Gruvbox Material
Gruvbox is an extremely popular color scheme from vim and with this extension you can get it in VS Code.
It might not be very everybody but I love it because the low contrast makes it easier to look at for long periods of time.
GlassIt-VSC
GlassIt-VSC allows you to easily make the VS Code windows transparent and easily adjust it to suit your personal preferences.
This is definitely a personal aesthetic choice but I've always liked a bit of transparency for my terminal and now I can have it in VS Code too.
You can see this in the screenshot above in the Gruvbox Material section.
Live Server
Live Server allows you to quickly and easily launch a local web development server.
It even has a live reload feature so any changes that you make to your website will automatically update in your web browser.
This makes working on websites in VS Code incredibly convenient. Every little helps when you are spending countless hours tweaking CSS to get your website looking just right.
advanced-new-file
This allows you to easily create new files and folders anywhere in your workspace without having to navigate through the file explorer. Just use a quick keyboard shortcut ctrl+alt+n and type the location of the file or folder you'd like to create and it's done!
If you use this in conjunction with ctrl+p to open any file in your workspace and the vim extension then your hands never have to leave the keyboard. Pretty neat!
Summary
Those are my top 5 extensions. Hopefully there are some in there that you haven't heard of before and will check out for yourselves.
What are your favourite VS Code extensions? Get in touch via e-mail or twitter. Contact details be found here.
May 01, 2021
Somebody recently asked me the steps I take to setup my environment for a new python project so I thought I'd write a small post on this topic because it might be beneficial to others.
There are a lot of tools out there such a venv, pipenv and poetry for managing your python environments.
I like to use venv personally as it is built in to python and simple enough to use.
Create a git repository
Lately I always use github for any projects even if they are just personal and I want to keep them private.
You never know if at some point you'll want to make them public and the added piece of mind of having a copy of the code online is a huge benefit.
So since we are going to use github, it's easier to just create the repository on github and clone it rather than going through the dance of git init,renaming the branch to main, git remote add origin.
You also get a few added benefits such as github creating the README, .gitignore and LICENSE for you.
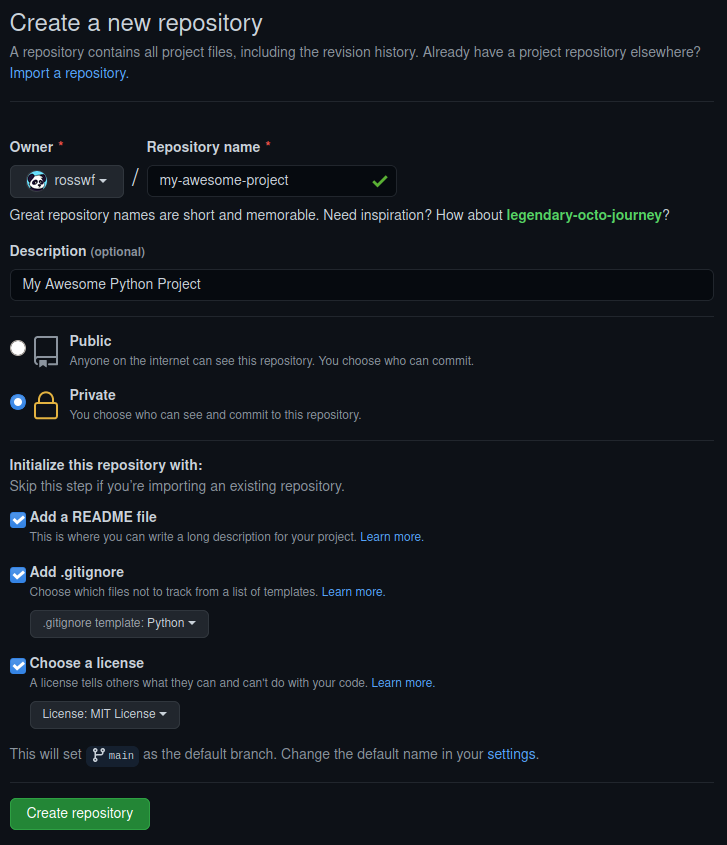
I like to use the MIT License but feel free to choose which one suits you the most.
Clone the repository
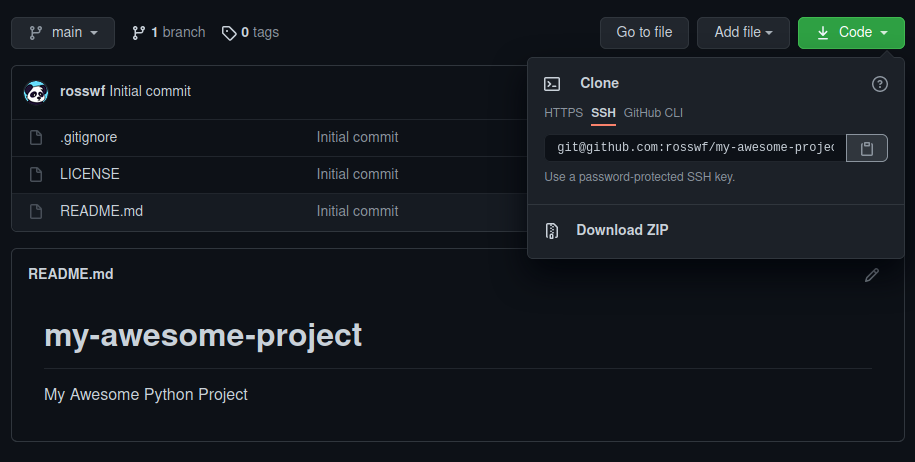
Now that we have created the repository on github it's time to clone it.
Click the green code button and copy the link. Here I am using SSH but if you don't have SSH keys setup, feel free to use HTTPS. I might cover SSH in another blog post at some point if any of you feel that would be beneficial.
Now we have the link, we just use git clone on the command line. I save all my projects in a folder in my home directory named python.
~/python$ git clone git@github.com:rosswf/my-awesome-project.git
Cloning into 'my-awesome-project'...
remote: Enumerating objects: 5, done.
remote: Counting objects: 100% (5/5), done.
remote: Compressing objects: 100% (4/4), done.
remote: Total 5 (delta 0), reused 0 (delta 0), pack-reused 0
Receiving objects: 100% (5/5), done.

~/python$ cd my-awesome-project/

~/python/my-awesome-project$ ls -l
total 67
drwxrwxr-x  3 ross ross    6 May  1 12:36 ./
drwxrwxr-x 10 ross ross   16 May  1 12:36 ../
drwxrwxr-x  8 ross ross   13 May  1 12:36 .git/
-rw-rw-r--  1 ross ross 1799 May  1 12:36 .gitignore
-rw-rw-r--  1 ross ross 1061 May  1 12:36 LICENSE
-rw-rw-r--  1 ross ross   47 May  1 12:36 README.md

~/python/my-awesome-project$ git status
On branch main
Your branch is up-to-date with 'origin/main'.

nothing to commit, working tree clean
There we go, the repository has been cloned and we can see all the files that github created for us. Using git status we can also see we are up to date with origin/main.
Creating and activating a virtual environment
Create the virtual environment
Here we are running the venv module and telling to use venv as the name for our virtual environment but feel free to change this to something else if you'd like.
~/python/my-awesome-project$ python3 -m venv venv

~/python/my-awesome-project$ ll
total 84
drwxrwxr-x  4 ross ross    7 May  1 12:41 ./
drwxrwxr-x 10 ross ross   16 May  1 12:36 ../
drwxrwxr-x  8 ross ross   13 May  1 12:38 .git/
-rw-rw-r--  1 ross ross 1799 May  1 12:36 .gitignore
-rw-rw-r--  1 ross ross 1061 May  1 12:36 LICENSE
-rw-rw-r--  1 ross ross   47 May  1 12:36 README.md
drwxrwxr-x  6 ross ross    8 May  1 12:41 venv/
We can see the venv folder has been created. Don't worry about the contents of this too much, it's basically taken a copy of the python interpreter and it's where any packages will be installed while the environment is active. The only thing that we actually need to worry about is the script for activating.
Activate the virtual environment
~/python/my-awesome-project$ source venv/bin/activate

(venv) ~/python/my-awesome-project$
You can tell it's worked because the name of the virtual environment will be added to the beginning of your shell prompt. In this case (venv).
Note that the above is for activating it on linux. If you were using command prompt on windows you would simply run the activate.bat located in the Scripts folder.
You can find more information on activating for your specific shell in the documentation
C:\python\my-awesome-project\> venv\Scripts\activate.bat
If you ever want to deactivate the virtual environment you just need to type deactivate.
That's pretty much all that's required. We now have everything we need to start writing some code:
- A git repository that we can easily push to github
- A clean virtual environment to begin installing packages
Installing packages and generating requirements.txt
Since most projects will typically use packages from PyPI next we will install the ones we require and generate a requirements.txt file which will make it easier for anybody else that wants to use our project to quickly and easily install all the required packages.
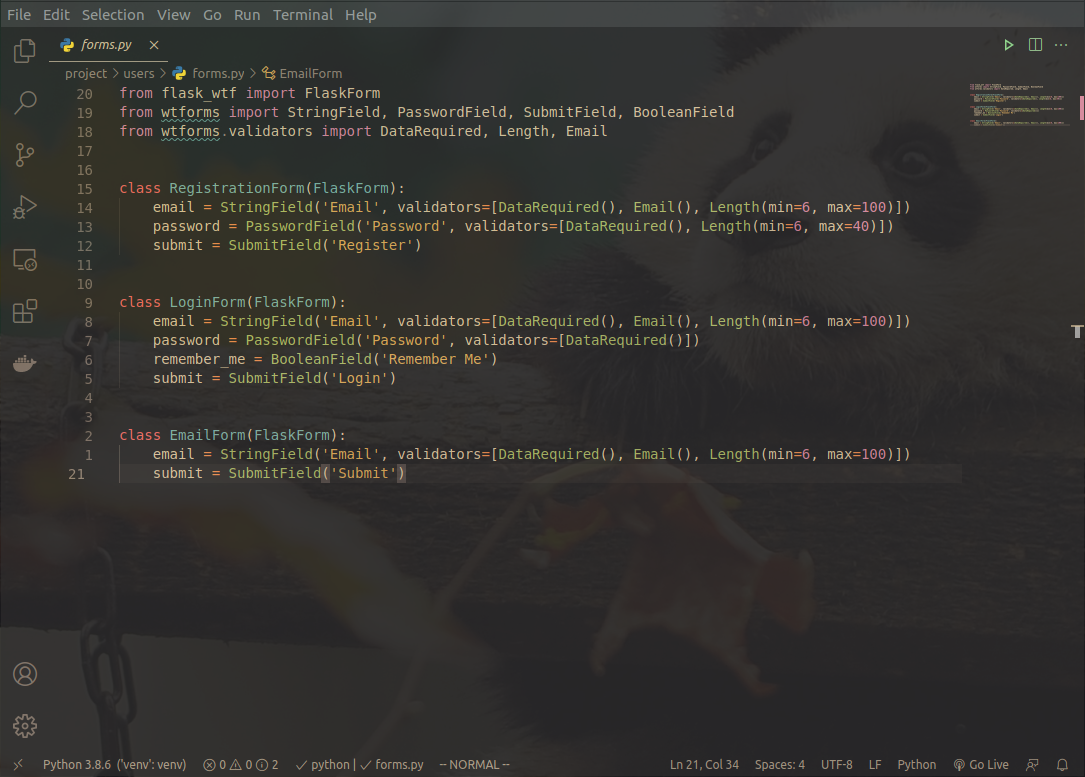
As an example I'm going to install Flask.
(venv) ~/python/my-awesome-project$ pip install flask
[...]
Installing collected packages: click, MarkupSafe, Jinja2, Werkzeug, itsdangerous, flask
Successfully installed Jinja2-2.11.3 MarkupSafe-1.1.1 Werkzeug-1.0.1 click-7.1.2 flask-1.1.2 itsdangerous-1.1.0

(venv) ~/python/my-awesome-project$ pip freeze > requirements.txt

(venv) ~/python/my-awesome-project$ cat requirements.txt
click==7.1.2
Flask==1.1.2
itsdangerous==1.1.0
Jinja2==2.11.3
MarkupSafe==1.1.1
Werkzeug==1.0.1
There we go, Flask and all of it's dependencies are installed and are now listed in our requirements.txt.
This is why a virtual environment is great! You can install just the packages and any specific versions you need for that particular project and easily generate the requirements.txt file.
Push to github
Although we haven't written any code yet I'm going commit and push the requirements.txt to github.
(venv) ~/python/my-awesome-project$ git add requirements.txt

(venv) ~/python/my-awesome-project$ git commit -m "Add requirements.txt"
[main aa1b945] Add requirements.txt
 1 file changed, 6 insertions(+)
 create mode 100644 requirements.txt

(venv) ~/python/my-awesome-project$ git push
Enumerating objects: 4, done.
Counting objects: 100% (4/4), done.
Delta compression using up to 8 threads
Compressing objects: 100% (3/3), done.
Writing objects: 100% (3/3), 356 bytes | 356.00 KiB/s, done.
Total 3 (delta 1), reused 0 (delta 0), pack-reused 0
remote: Resolving deltas: 100% (1/1), completed with 1 local object.
To github.com:rosswf/my-awesome-project.git
   1ba307f..aa1b945  main -> main
The above pattern is how files that have been added or modified would be committed and pushed to the repository:
git add <files> - Stage the files ready to be committedgit commit -m "My sensible commit message" - Commit the files with a sensible messagegit push - Push to github
git status is also an extremely useful command. Try running this before each of the steps above and see what the output is.
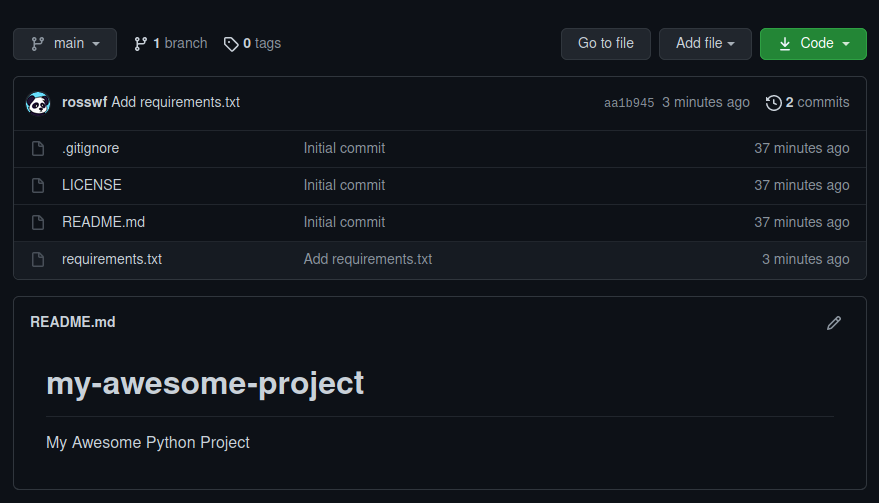
After checking our repo on github we can see that the requirements.txt file is there along with our commit message!
Summary
Hopefully the above was useful in helping you get setup with a clean environment for the next python project you are working on.
As I mentioned at the start there are numerous ways to go about this with all sorts of different tools created by the community.
Let me know what you use! Contact details be found here.